
The Oregon Trail, 1869, oil on canvas by Albert Bierstadt
On April 11, 1849, William Swain rose early and began packing for a long overland journey that would take him far from home.
The twenty-seven-year-old was destined for the famed riches of the California gold rush. His brother George waited eagerly behind, vowing to make the trip soon after if what he read in the papers was true.
It did not go well for William.
The arduous journey nearly took his life, and he eventually arrived on the west coast to find a wild, rapidly-growing town where exorbitant prices catered to those that struck gold. William did not.
He wrote home in November 1850:
“I have made up my mind that I have got enough of California and am coming home as fast as I can.”
He returned home without the riches he was certain he’d find, but William was alive and spent years recounting stories of his journey.
The words you’re reading were published on my first GatsbyJS frontend for Craft CMS. It’s glowing with the white-hot magic of the JAMstack.
I left my comfortable Twig microcosm to see what it looks like on the other side, and I’d like to invite you to be my George. To see if my journey might inform yours.
It took a few solid weeks before I was comfortable pointing workingconcept.com to Netlify, but I finally got there in spite of an ongoing list of problems to solve.
I was eager to see if I could pull off this stack jump without requiring compromises for a future client. I’d only like to build projects this way if the resulting experience could be indistinguishable for a content editor.
Maybe you’re curious too, busy with other things because you use your time wisely and didn’t run at this like a maniac. Great! I’d like to share what I’ve learned and what I have left to figure out.
Background
I wrote earlier about my interest in headless Craft projects. Aside from being new and interesting, they’d push me to build more dynamic frontends, improve site performance and security, and eliminate some of the burden of hosting. It used to be that a JavaScript-heavy frontend came with tradeoffs like poor SEO and a convoluted relationship to a CMS, but projects like Gatsby and Gridsome make it easier to serve a performant, well-rounded website.
With a rush of enthusiasm from Dot All, it took me about two weeks to get to the point where I could switch to a Gatsby frontend. I made the leap once I figured no human or spider (hi, Google!) would spot an immediate difference.
But this didn’t take me two weeks.
I started more than a year ago and repeatedly smacked into hurdles only to wander off and return later. I kept my eye on all the new fancy and started noticing patterns, gently folding them into my work. This helped ease the conceptual transition between workflows and gives the false impression I had a plan:
- Challenged myself to build a simple set of components using Vue, React, Svelte and Stencil and learned that they’re similar kinds of building blocks. (Seriously, build an accordion with each framework and you will feel your brain expand!)
- Started organizing my Twig templates into more discrete nuggets, with the help of Ben Rogerson’s Storybook starter project. This oriented my thinking toward components.
- Painstakingly created and then ditched my custom webpack config for Laravel Mix, which let me use webpack while tripping over it less.
- Fully cached some Craft projects, HTML and all, with Cloudflare and CloudFront. I routed some form submissions to a Laravel handler turned Slim app turned Lambda function.
- Built and deployed a handful of small Lambda functions, which the Serverless framework made easier and more fun.
- Built a tiny, markdown-powered personal site using both Gridsome and Gatsby to get my first look at those projects and start querying things with GraphQL.
- Tried and failed several times to rebuild this site with Gatsby.
Mapping Things Out
This site made a good test project because it’s fairly simple and I’ve rebuilt it bunches of times. It helped to translate a familiar thing rather than build something new from scratch.
| Sections | Singles | Globals | Locales | Sites | Forms | Volumes |
|---|---|---|---|---|---|---|
| 4 | 12 | 4 fields | 1 | 1 | 4 | 8 (local) |
It had a modest number Sections and Entries, along with a few forms that already posted to a form handler Lambda function that was part of an earlier quest. I was hosting images on local Asset Volumes behind Cloudflare, using Imager for transforms.
I hand rolled SEO using templates for meta details, structured data and an XML sitemap, along with some simple fields for overriding defaults. The only third-party plugins responsible for content are Super Table and Table Maker. (Table Maker doesn’t yet support GraphQL so I’m using a fork I submitted as a PR.)
At a high level, this left me with a clear to do list:
- Map Singles to Gatsby pages.
- Generate blog, plugin, and tag pages.
- Generate blog RSS, XML and JSON feeds so both readers continue to enjoy their subscriptions.
- Fetch plugin changelogs at build time and make them available to plugin pages.
- Maintain SEO sitemap, on-page meta and JSON-LD customization.
- Figure out how to handle Asset Volumes since I want Craft managing Assets without those files being hosted on the CMS stack.
- Choose a strategy for handling image transforms.
- Translate the Twig frontend to React (and keep using Tailwind).
- Get Live Preview working.
- Pick a host for the static site and decide on a build strategy.
- Set up separate domains for the static site, Craft CMS, and Assets.
Microservices
This could be its own post, but I wanted to mention Lambda functions since they’re integral and I knew I’d rely on them before I mapped out my goals.
Reducing Craft to an API means other things have to pick up some slack. I’ve tried to adhere to The JAMstack Way™ by embracing microservices, using discrete little APIs rather than a pile of them on a specific stack. I did this by using a few Lambda functions, which are just bits of code AWS runs for you with on-demand infrastructure.
You write the code and get it into the AWS machinery, and AWS takes care of everything else. No servers to maintain or scale.
Like anything AWS, it’s also a double-edged sword. There’s a little universe of useful things you can tie together for your Lambda function if you want, like a CDN or caching or S3 storage. Machine learning, even. If you’re not a devops engineer setting it up might be enough to send you fleeing. I happily worked with the Serverless framework, which abstracted away configuration so I could focus on writing and deploying Lambda functions. I wrote some from scratch and forked an existing project for a minor adjustment, which we’ll come to later.
If you’d like to play with Lambda functions, I highly recommend starting with Serverless unless configuring AWS sparks joy.
serverless deployDeploying a Lambda function from your local project with Serverless.
serverless deploy --stage prodDeploying a Lambda function to production.
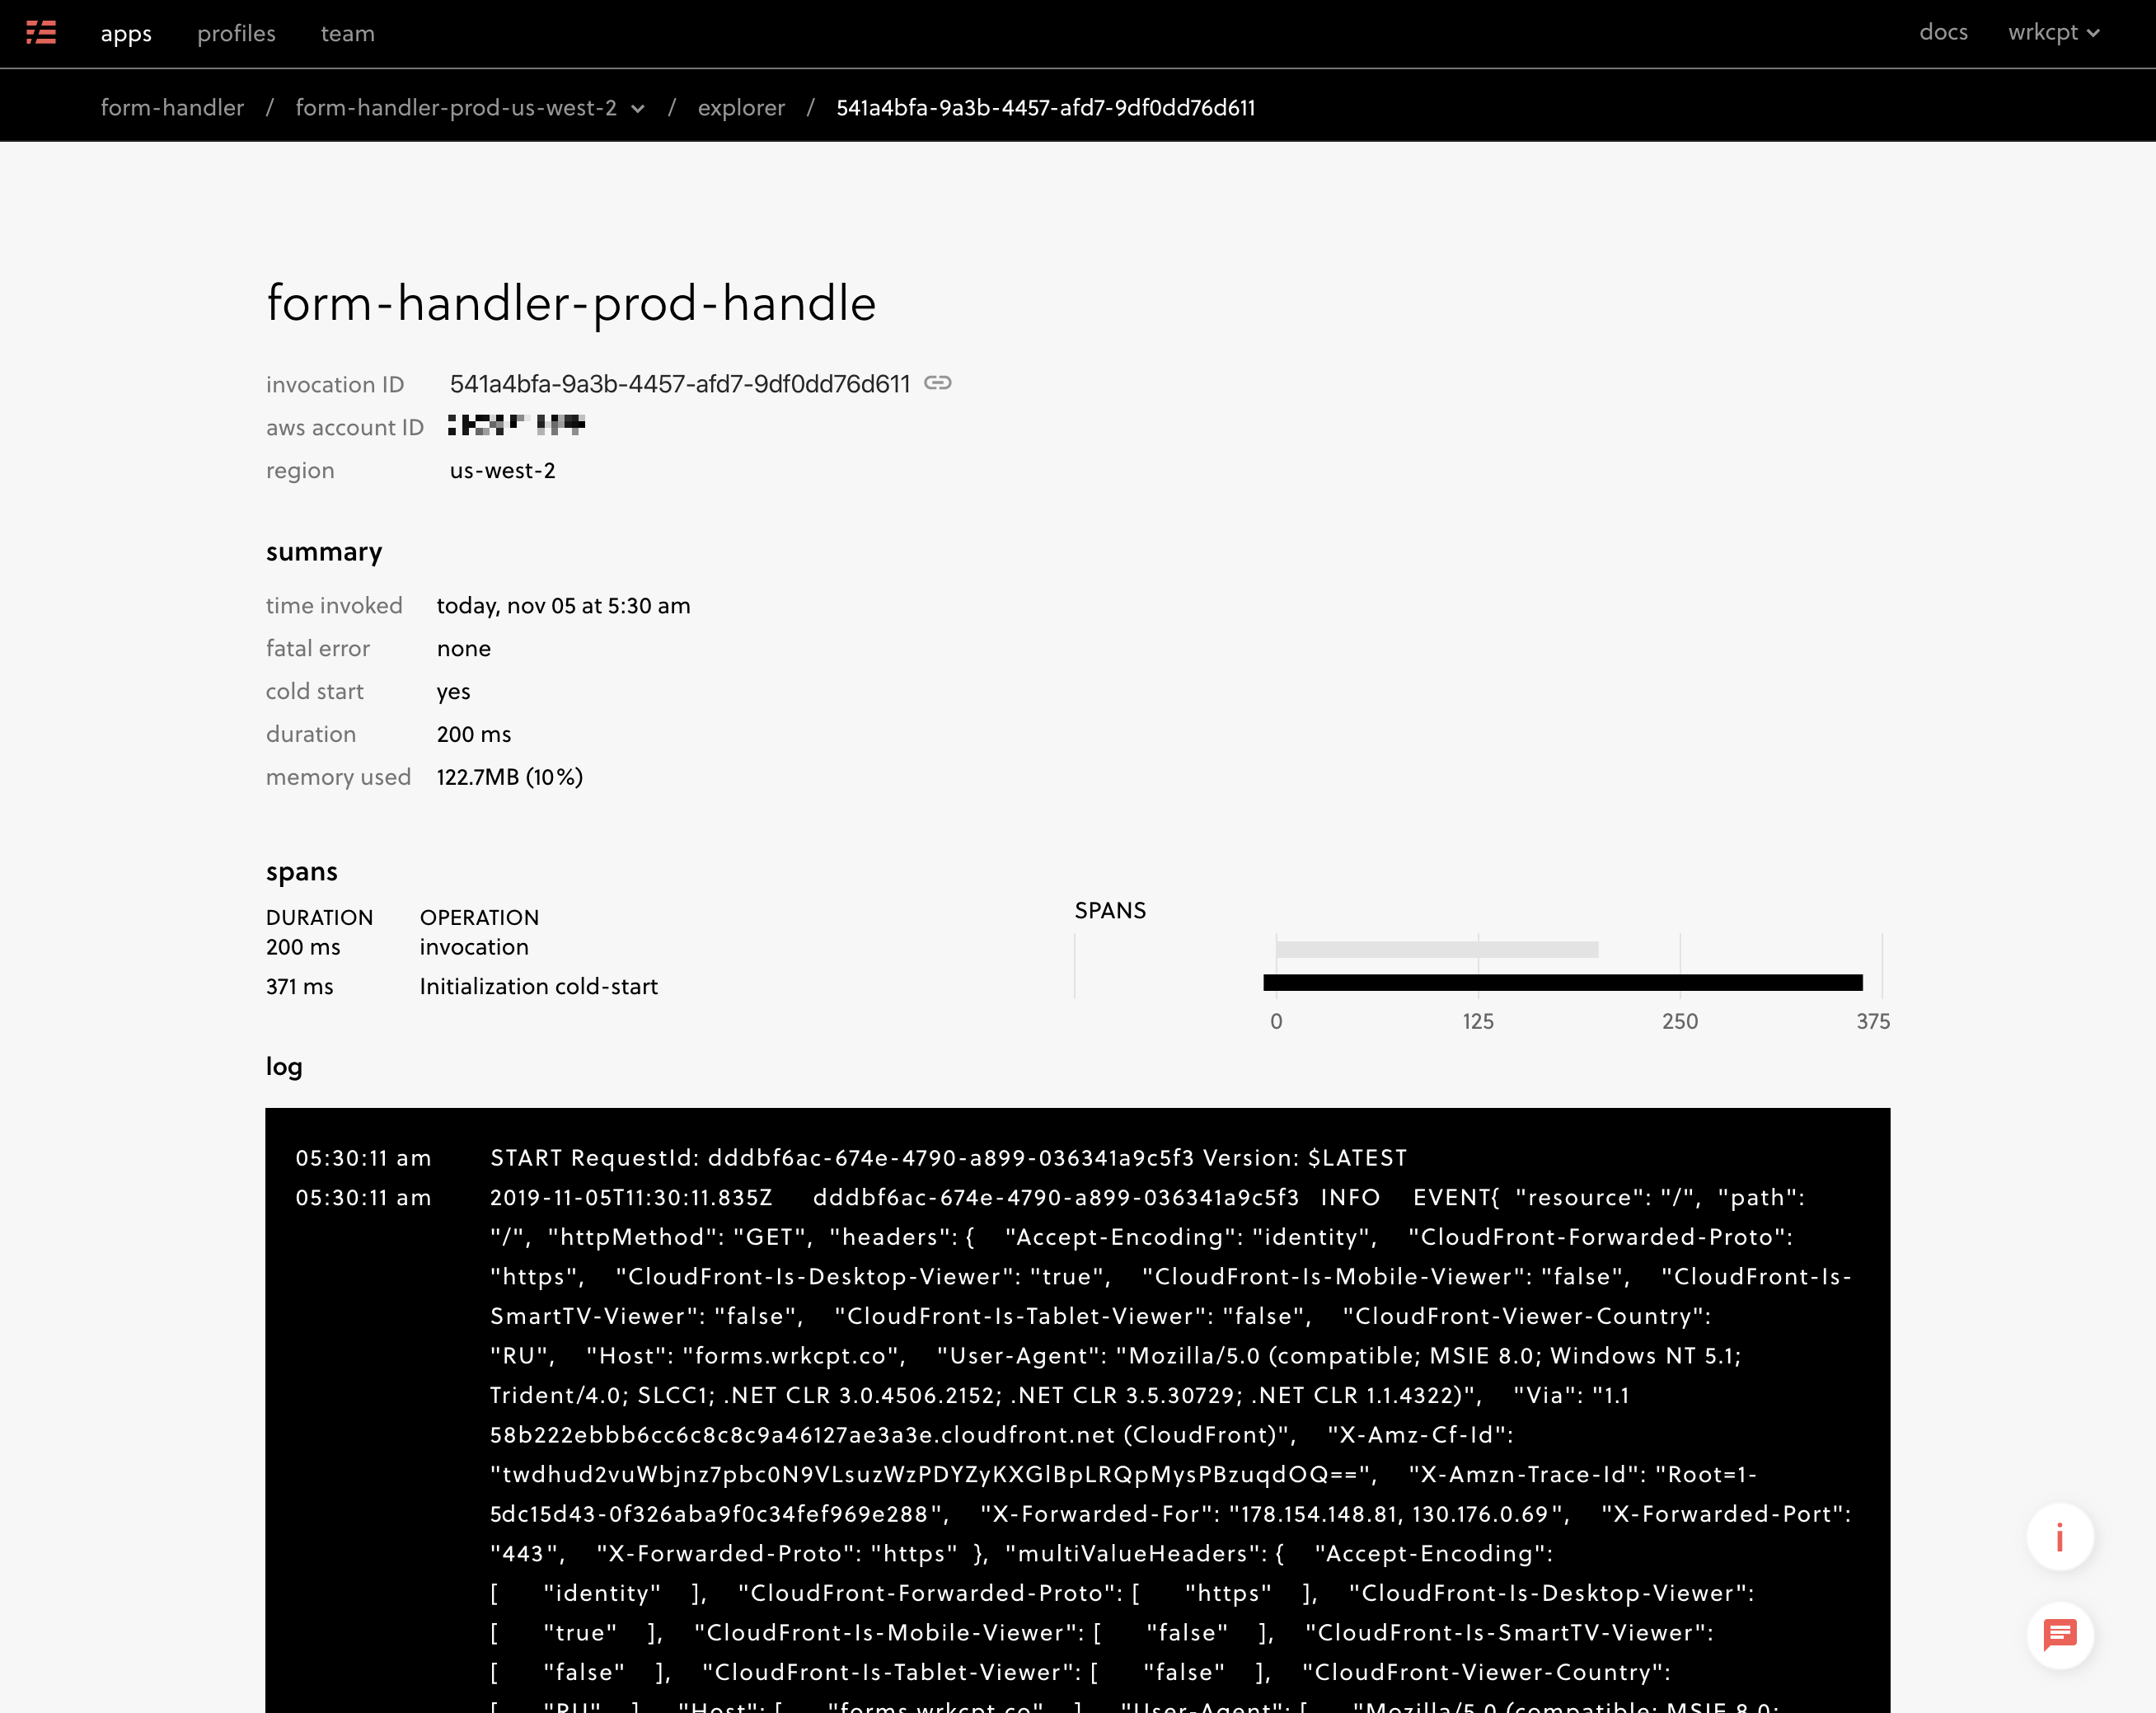
Looking at a form handler invocation in the Serverless dashboard. Monitoring and performance metrics are nice perks.
If you need a little API to do something and you can write code to do it in JavaScript1, you can write and deploy a Lambda function. It can be ten or ten thousand lines of code, whatever it takes to do the job.
Building the Site Structure
Craftsby Connection
The first step on the Craft CMS side was to have it speak GraphQL. The Element API would have worked too, but with more time to configure and adjust later.
I started with CraftQL, later replaced by Craft’s native GraphQL support. Now it’s as simple as setting up a private key for Gatsby and adding 'api' => 'graphql/api' to config/routes.php.
On the Gatsby end I kicked off a new starter project with gatsby new gatsby-site, adding TailwindCSS and plugins mostly for SEO and minor site features. The complete list:
gatsby-plugin-canonical-urlsfor addingrel=canonicalto pagesgatsby-plugin-catch-linksfor handling internal links, which Gatsby wants in<Link />components, when they’re otherwise embedded in markdown or HTML from the CMSgatsby-plugin-disqusfor mostly silent blog commentsgatsby-plugin-fathomfor self-hosted Fathom analyticsgatsby-plugin-manifestfor favicon + PWA theme stuffgatsby-plugin-netlifyfor easy redirects and URL wrangling with Netlifygatsby-plugin-offlinefor impossibly simple service worker setupgatsby-plugin-postcssfor compiling PostCSSgatsby-plugin-purgecssfor purging unused CSSgatsby-plugin-react-helmetfor managing<head>gatsby-plugin-remove-trailing-slashesfor keeping trailing slashes out of generated URLsgatsby-plugin-robots-txtfor generating a robots.txt filegatsby-plugin-sharpfor manipulating some images at build timegatsby-plugin-sitemapfor generating an XML sitemapgatsby-plugin-svgrfor loading SVG files into templates
A vital part of the Gatsby configuration, which arrived like mana from heaven, was Mike Pierce’s gatsby-config.js. He shared it with the warning that it wouldn’t scale beautifully, but it solved two things I hadn’t.
The first was keeping the GraphQL endpoint and token in environment variables and out of git. Not revolutionary, but a sensible thing I wasn’t yet doing.
const craftGqlUrl = process.env.CRAFT_GQL_URL;
const craftGqlToken = process.env.CRAFT_GQL_TOKEN;
The second gem was something I tried and failed at, which was passing Craft’s Live Preview token on to Gatsby when it exists:
developMiddleware: app => {
  app.use('*', (req, res, next) => {
    if (req.query.token) {
      store.set('X-Craft-Token', req.query.token);
      sourceNodes();
    }
    next();
  });
},
If you would have figured this out in less than two days, you and I are different creatures. And you should probably hang out with Mike Pierce and all his unicorn friends.
Now for some pages.
Singles
I started by mapping Singles to Gatsby pages. So the Homepage and About Singles, for example, found their homes in pages/index.js and pages/about.js in Gatsby. People seem to have strong feelings about Singles and you may be one of them, so we’ll leave it at that.
pages/
    404.js
    about.js
    blog.js
    blog/tags.js
    colophon.js
    feedback.js
    haq.js
    index.js
    plugins.js
    privacy.js
    project-brief.js
    services.js
    support.js
    work.js
Each page has its own GraphQL query to grab whatever content it needs. It looks different in Gatsby and Gridsome templates, but it’s the exact same idea.
Entries
The same goes for generating dynamic (Entry detail) pages with Gatsby and Gridsome: use the project’s API to define, all in one place, the pages that need to be generated at build time.
With Gatsby, this happens in gatsby-node.js.
You’ll see examples of this in starter projects and documentation: get the results of a GraphQL query, then loop through them and tell Gatsby how to translate each item into a page.
templates/
    blog/
        entry.js
        tag.js
    landing/
        entry.js
    plugins/
        changelog.js
        overview.js
        support.js
Synchronous Challenges
This was painless until I needed two things that forced a lot of swearing learning:
- Grab each plugin’s GitHub changelog at build time, to be used on the detail page.
- Generate blog RSS, Atom and JSON feeds including full post content, which is made up of Matrix blocks.
Each task needed to happen at a specific point in the build process.
I first needed the plugin’s changelog in order to parse it for the plugin page template. I struggled enough with the build process that my first working solution was a tiny external API, built with a Lambda function, simply to take a changelog URL and return it as parsed JSON. This was an elaborate way of not learning to use promises, which is what I eventually did instead: used axios to fetch the changelog and changelog-parser to turn it into an object before dropping that object into the created page context.
I wound up building my feed content by waiting until after the blog post HTML was generated. It’s gross and it works.
When you’re using Gatsby’s createPages API, you’re returning a series of promises that can be executed in any sequence. If you’re going to need things to happen in a specific order, you’re going to need to get comfortable using promises and method chaining in order to do that.
exports.createPages = async ({ graphql, actions }) => {
  /**
   * blogPosts, blogTags, plugins, landingPages and changelogPages
   * are all promises following the pattern:
   * `const blogPosts = graphql(query).then(result => {
   *    result.posts.forEach(post => {
   *      createPage()
   *    })
   *  })`
   */
  return Promise.all([blogPosts, blogTags, plugins, landingPages]).then(() => {
    // changelogPages come last
    return Promise.all(changelogPages)
  })
}
Distilled example of how I needed to chain promises so changelog pages were built last.
The changelog pages also include a round trip to fetch the changelog markdown from GitHub, but the promise chaining works in the same way.
Building blog feeds was something that would’ve taken minutes using Twig but had me stuck for hours trying to get my head around SSR, or Server Side Rendering.
You already know what Server Side Rendering is because that’s all Twig has ever done: it executes server-side PHP to generate markup and return it all at once to the browser. React uses node to render something like HTML skeletons at build time—you’ll see the static HTML files in the build folder—and these are important for things like SEO and RSS feeds that can’t rely on JavaScript to pop in and manage what’s sent to the browser.
Precisely how this happens is still a mystery to me.
My struggle with the feeds was the content. Because it’s markup generated from a series of Matrix blocks, it’s not as simple as working with a single markdown or rich text field that can be primped for the feed. Some transformation into HTML is required, and yet rendering nested React components in node is not trivial.
ReactDOMServer.renderToString() exists for this purpose, but I tried and failed to get it to generate my post content. This subject could be a long, sad post of its own but I ended up getting around it for now by...
- using
node-html-parseringatsby-node.jsto pull the content from already-generated blog post pages - adding some code in
gatsby-node.jsto escape the post content’s code snippets and replace markup intended for lazyloading - using the
exenvpackage’scanUseDOMas a switch in myPicturecomponent to avoid component lazyloading in a node context
I’m not proud of this, but it’s a shiningly clear example of how Twig and React are different animals.
/**
 * Extracts <article> from generated HTML and modifies its format for syndication.
 * @param {*} entry
 */
const getPostContent = entry => {
  const filepath = './public/' + entry.uri + '/index.html'
  const generatedMarkup = fs.readFileSync(filepath, 'utf-8')

  const pageDOM = HTMLParser.parse(generatedMarkup, { pre: true })
  const article = pageDOM.querySelector('article')

  // redacted for author's dignity; lots of string-manipulating HTML

  return articleMarkup
}

/**
 * Builds a single feed object to be output in different formats.
 * https://www.npmjs.com/package/feed
 */
const buildFeed = entries => {
  const feed = new Feed({
    // ...
  })

  entries.forEach(entry => {
    feed.addItem({
      title: entry.title,
      id: 'https://workingconcept.com/' + entry.uri,
      link: 'https://workingconcept.com/' + entry.uri,
      published: moment(entry.postDate).toDate(),
      date: moment(entry.dateUpdated).toDate(),
      content: getPostContent(entry),
      author: [
        {
          name: entry.author.name,
          email: entry.author.email,
        },
      ],
    })
  })

  return feed
}

exports.onPostBuild = async ({ graphql, actions }) => {
  const blogPosts = graphql(`
    query {
      craftGql {
        entries(section: "blog", limit: 50, orderBy: "postDate desc") {
          id
          title
          postDate
          dateUpdated
          uri
          author {
            name
            email
          }
        }
      }
    }
  `).then(async result => {
    if (result.errors) {
      console.log(result.errors)
      return reject(result.errors)
    }

    const publicPath = `./public`
    const posts = result.data.craftGql.entries
    const feed = buildFeed(posts)

    await fs.writeFile(publicPath + `/blog/atom.xml`, feed.atom1())
    await fs.writeFile(publicPath + `/blog/rss.xml`, feed.rss2())
    await fs.writeFile(publicPath + `/blog/feed.json`, feed.json1())
  })

  return Promise.all([blogPosts])
}
Abbreviated version of using Gatsby’s onPostBuild hook to generate blog feeds after pages were built.
Templates & Styles
Twig → JSX
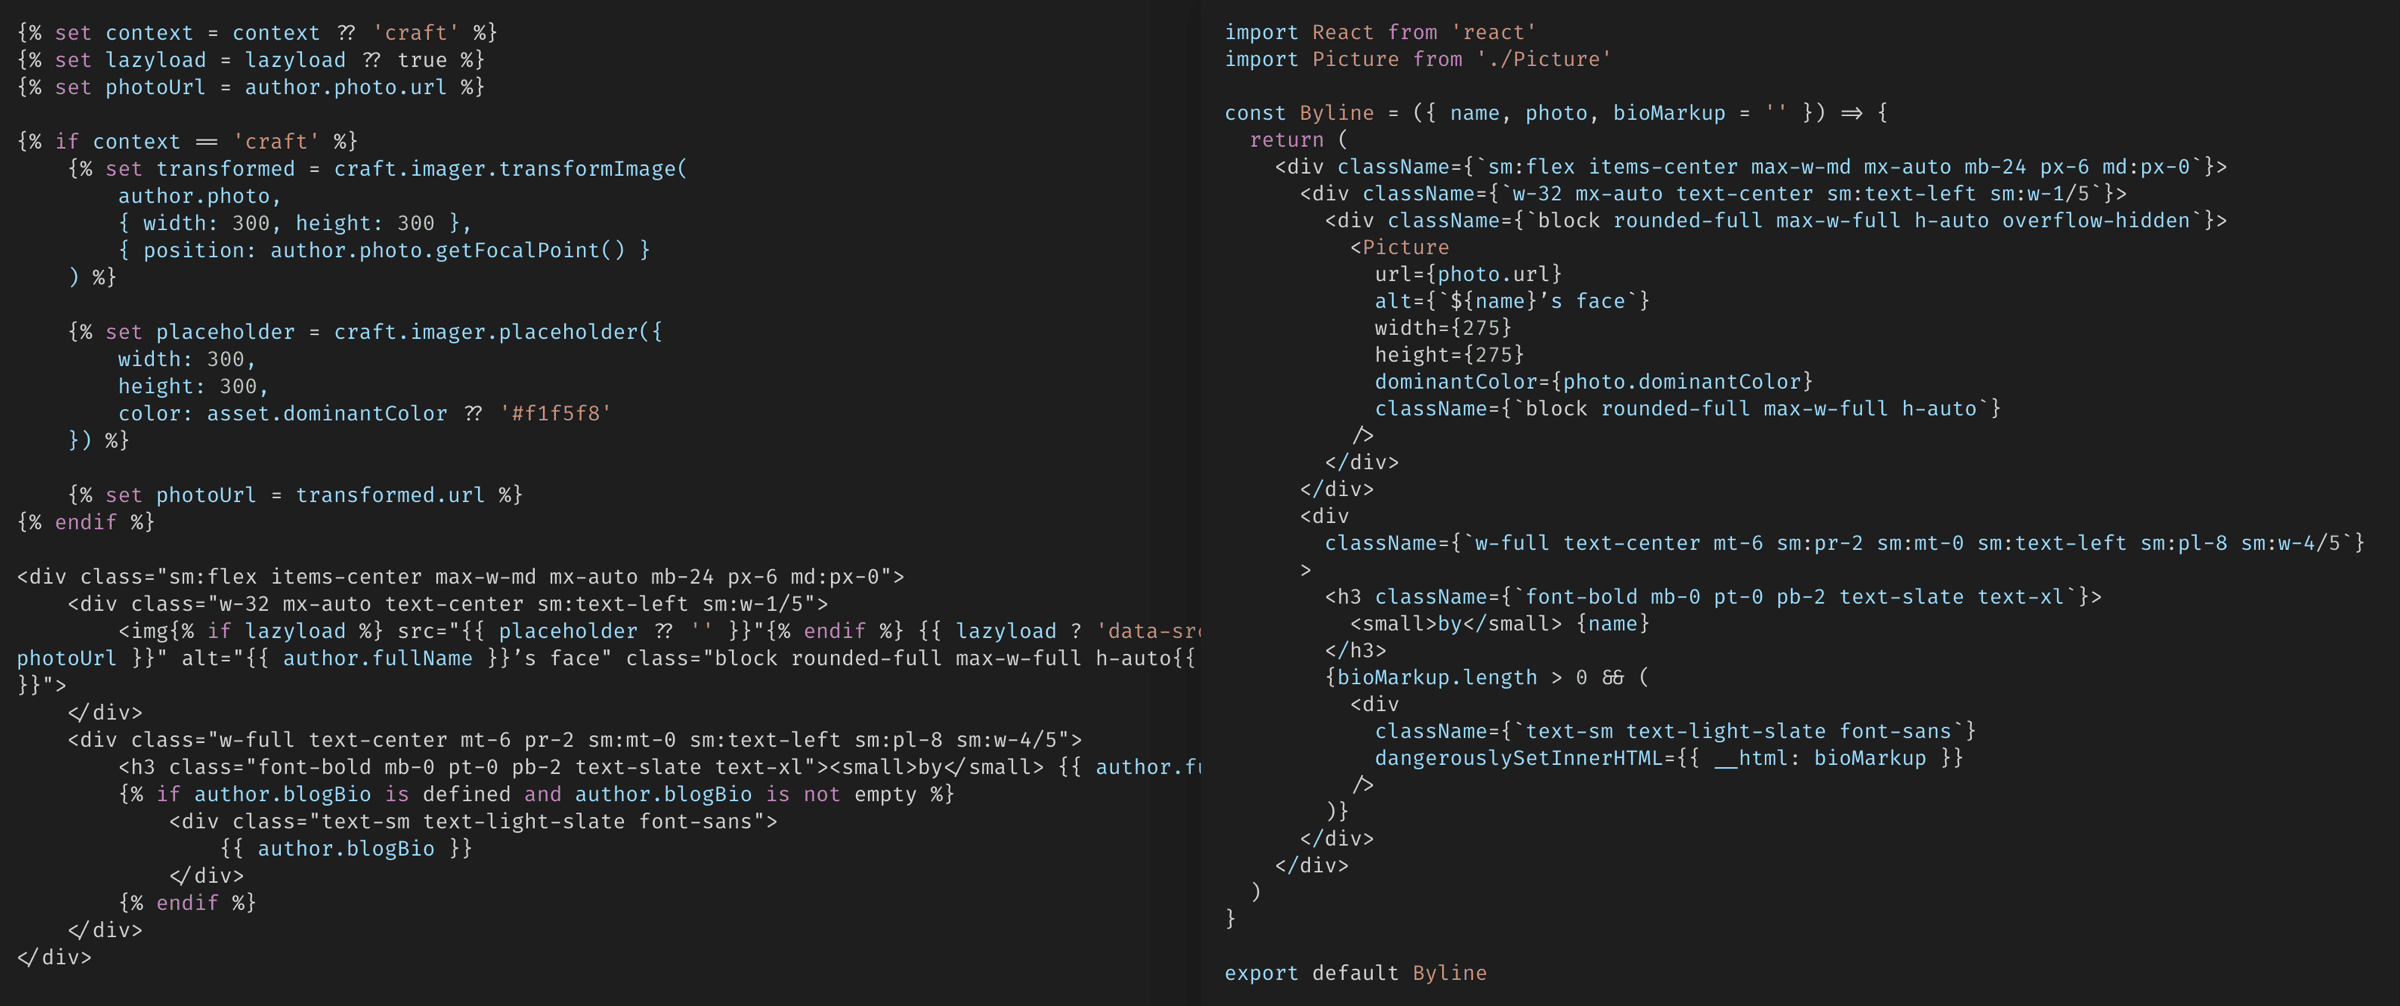
I had a lot of fun converting my component-esque Twig templates into React components.
It's all just code.
Getting comfortable with JSX was awkward at first, especially compared to single-file Vue components.
My old friend class would always insist on being called className, and I’m sure that my first wobbly JSX components were terrible. (Now they’re probably okay.)
After a few days of classic type-and-squint confusion, however, it became oddly satisfying to organize components, use my familiar Tailwind classes, and get instant visual feedback in the browser with Gatsby’s hot module reloading (HMR). A subtle perk to HMR with React was having component states persist even as my changes were applied. This may sound trivial, but having a little menu stay expanded while styling it is delightful. No page refresh and clicking it back open. Things like this reduced friction and made it easier to stay focused.
I also found myself abandoning my comfortable four-space indents for just two and allowing Prettier to format my JSX templates on save. What started uncomfortably quickly turned into a much faster pace, no longer wasting time pushing characters around. What? You already work this way? Good for you, showoff.
There was a moment when I realized single-file Vue components seem more cleanly-structured and aesthetically pleasing, but that JSX is powerful because JavaScript can be freely woven into any part of it. In that way, working with JSX is sort of like the PHP we used to blend with HTML.
I’m still uncomfortable with this thought.
Tailwind
Andrew wrote about how he used Tailwind for CSS-in-JS with Emotion, but I kept it simple (familiar) simply applying my utility classes and relying a global stylesheet. I’d like to embrace CSS-in-JS, but I’m not in any rush with this small site. If you don't know what that is and you want to hear me be confused about it, this podcast episode has you covered.
Links
Gatsby handles routing in ways I probably don’t even appreciate yet, and the only time I had to care was remembering to use the provided <Link> component for links between pages on the site. Some internal anchors arrive within content, like HTML in a Redactor field, but luckily gatsby-plugin-catch-links exists for automatically catching and handling those.
Obscure SVG Renderer
I’ve published two blog posts that use charts.
A chart from another post, built the hard way.
To avoid making anything easy, I wrote a Craft module to take Table Maker content and render it into an SVG bar chart so I could have complete control over how it looked and privately struggle with simple math again.
Because of that choice, I had to port that PHP into a React component.
To my surprise, it was actually fun! Using React to render SVG is actually fun! Some of the first things I built on the internet were in Flash, and my first experience with programming on the web was in ActionScript—it was fun to write code that directly translated to dynamic visuals in a browser, and this little exercise (again with HMR) helped me see what fun can be had in client-side, componentized SVG.
Building the frontend wasn’t all laughter and happy little surprises, though.
Form Validation
Write down the term “stateful component” and plan on coming back to it.
I learned the difference, first with form validation and again with a subnavigation component, between stateless and stateful components. If you’re a methodical learner you probably encountered this somewhere in your React introduction.
If you’re me, you learned by first doing it the wrong way that your state-dependent things are going to need
- a class-based React component
- to be tied to properties literally held in an aptly-named
stateobject of said component
You can work with Vue and not fully realize this, but React lets you both completely disregard state and requires you to explicitly manage it when it’s important.
Writing a stateful component isn’t hard.
- Make sure your JSX component is a class that extends
React.Component. - Set your initial
this.stateobject in the constructor. - Change state properties with
this.setState().
My form validation still feels like it could be refined, and it wasn’t all that fun to solve, but a combination of simple-react-validator and some attention to state management got my form validation working in a way I could live with.
JSON-LD
Lastly, my struggle with JSON-LD was awful. Using Helmet to manage metadata was pleasant. Building schema.org structures felt inherently closer to “the metal” in JavaScript land. But rendering those JSON structures in <head> with Helmet turned out to be deeply frustrating.
The author’s silent, failed struggle with duplicate structured data.
Not because it was hard to do or find examples. I’ve used several methods, and currently I’m prepping an object and giving it to Helmet’s script prop:
// SEO.jsx
// schemaOrgGraph combines site-wide default and stuff added by pages

const schema = {
  type: 'application/ld+json',
  innerHTML: JSON.stringify({
    '@context': 'http://schema.org',
    '@graph': schemaOrgGraph,
  }),
}

return (
  <Helmet script={[schema]}></Helmet>
)
Perhaps more aesthetically pleasing and just as valid is adding the script tag as Helmet’s child:
// SEO.jsx
// schemaOrgJSONLD: same but with `@context` and `@graph` at the top level

<Helmet>
  <script type="application/ld+json">
    {JSON.stringify(schemaOrgJSONLD)}
  </script>
</Helmet>
No matter how I get that structured data in there, when using Helmet I randomly get duplicate JSON-LD structures on some pages.
It took more digging into Gatsby and Helmet for me to learn that it’s probably because of how Gatsby determines when to split code. I think the JSON-LD looks like a normal script reference to Gatsby, as though I’m looking to load a <script src="foo.js"> tag in the <head> element. When Gatsby sees a script used frequently enough, it’ll have webpack split it into a chunk that gets loaded with the page. In this case the JSON-LD gets rendered into <head> and loaded in a chunk, so anything reading JSON-LD that executes JavaScript—like Google’s Structured Data Testing Tool—will see duplicate versions of each schema.org entity.
Google doesn’t consider this a problem so I’m trying not to either for now, but it drives me bonkers that I can’t figure out how to get around it without abandoning Helmet.
Image Handling
Many of you already store Craft Assets on S3 or Digital Ocean Block Storage or some cloud storage. All I did was join you on that front, moving my local Asset Volumes to S3 to get them off Craft’s server.
I’ve kept to local Asset Volumes and increasingly more powerful servers to handle image transforms, but I decided that in decoupling I’d like to leave Craft (and its webserver) with as little to do as possible. That means offloading image transforms someplace else.
Transforms at Build Time
Ideally this would happen at build time. Craft could supply source URLs, while Gatsby and Sharp could size, crop, create alternates and optimize as dictated by the frontend. Static files would be published, everything would be super fast, and Craft wouldn’t need to concern itself with the intensive task of manipulating images.
But Gatsby’s convenient Sharp abstractions are meant to work with images in the local filesystem, and the only way to have Gatsby transform remote images is to use gatsby-plugin-remote-images and describe every point in your schema where image URLs exist. It seems like that’d just duplicate the maintenance of any structural content changes, so I chose not to bother.
I decided I’d keep the frontend simple and give it the simple role of building the URLs needed for image transforms. Something else could do the heavy lifting.
imgproxy Transforms
Instead, I first used Docker to spin up imgproxy to use like my own private Imgix. imgproxy is an open source image resizing server written in Go that can work with images from any source. It was surprisingly fast and it didn’t take me long to sign its URLs to prevent being everybody’s Imgix. It can also handle resizing images with a precise focal point, which I’ll come back to.
I was happy with this solution until my favorite troll pointed out this journey is supposed to result in fewer servers to maintain, not more.
Serverless Transforms
So I pivoted to an AWS lambda function for serverless image transforms.
Andrew wrote a post about it I figured I could refer to if I got stuck. (Do not tell him.) And though it’s out of character for me, it was the path of least resistance: AWS writes and maintains the code and it’s supposedly production ready. Nothing to write, trivial to set up, and probably not much work to maintain. It’s also cheap and scalable.
The only work I needed to do was write code for building the transform URLs.
/**
 * Gets the extension from a URL, blindly trusting it has one.
 */
function getExtension(url) {
  const urlParts = url.split(`.`)
  return urlParts.pop()
}

/**
 * Generates an image transform URL for AWS Serverless Image Handler.
 */
function getAwsLambdaTransformUrl(props) {

  // don't attempt to transform unless we have an Asset in our bucket
  if (!props.url.includes(assetBucketName)) {
    return props.url
  }

  // determine target extension if one wasn't provided
  if (!props.extension) {
    props.extension = getExtension(props.url)
  }

  if (props.extension === 'jpg') {
    // set valid type for sharp (which doesn't want `jpg`)
    props.extension = 'jpeg'
  }

  const edits = {
    ...props.filters,
    resize: {
      width: props.width,
      height: props.height,
      fit: props.type,
      quality: props.quality,
    },
  }

  edits[props.extension] = {
    quality: props.quality,
  }

  if (props.extension === 'webp') {
    edits['webp'].lossless = true
  }

  // get the folder and filename relative to the bucket
  const key = props.url.replace(`https://${assetBucketName}/`, ``)

  // prep the object we'll send
  const request = {
    bucket: assetBucketName,
    key: key,
    edits: edits,
  }

  // base64-encode encode parameters
  const enc = Buffer.from(JSON.stringify(request)).toString('base64')
  return `${serverlessTransformEndpoint}/${enc}`
}
URL-building for image transforms.
This setup is what I’m using now, though the AWS function comes with a few drawbacks:
- sharp, on which the serverless image handler relies, is blazing fast but doesn’t support precise focal point handling. You can define “gravity” in general regions, but not the exact point as defined in the Craft control panel. Lovers of precision need to know this.
- The AWS image handler is not set up to use URLs with file extensions (like
.jpg), return a MIME type specific to the returned image, or supply ideal cache headers. - Transforms still happen on the fly and there are now separate cache invalidating concerns—both reasons I’d still prefer the simplicity of generating image variants at build time.
I solved the second problem by making a quick change to the Lambda function. It wasn’t any more complicated than editing a .js file and re-uploading it to AWS.
// getResponseHeaders() already existed
const headers = getResponseHeaders();

// I added this elegant part
// request.edits has settings for sharp to do the transform
if (request.edits.hasOwnProperty("png")) {
    headers["Content-Type"] = "image/webp";
} else if (request.edits.hasOwnProperty("jpeg")) {
    headers["Content-Type"] = "image/jpeg";
} else if (request.edits.hasOwnProperty("png")) {
    headers["Content-Type"] = "image/png";
} else if (request.edits.hasOwnProperty("webp")) {
    headers["Content-Type"] = "image/webp";
} else if (request.edits.hasOwnProperty("gif")) {
    headers["Content-Type"] = "image/gif";
} else if (request.edits.hasOwnProperty("tiff")) {
    headers["Content-Type"] = "image/tiff";
}
The dazzling code I used to have the image handler return an appropriate Content-Type header.
Lazyloading
Dropping lazysizes into any project is easy until it’s a React project. With Gatsby it’s easy to lazyload anything at all, but the more complex process of loading things means that lazyloading images is a bit less straightforward.
I ended up spending a few days on a utility for generating image transform URLs along with a <Picture> class that takes advantage of srcset and lazyloading with either a dominant image color (thanks Imager!) or blur effect. It could be better, but it works alright and behaves both in browser and node/SSR context.
Live Preview
As a developer it can be easy to forget how important Live Preview is for content authors.
We spin up a local environments, poke at things in the web inspector and use tools like BrowserStack and Sizzy to examine a site from many angles. A content author, the one for whom we’re building the site, probably does none of these things. Seeing their work and safely experimenting with it is critically important, and Live Preview may be the only tool available for that.
Live Preview is challenging with a decoupled frontend where Craft and that frontend know nothing about each other. I paused the headless quest more than once because Live Preview was impossible or excessively difficult or fragile. Someone else’s client found me looking for help with a headless Craft project built to their detriment: deplorable SEO, no Live Preview and a maintenance nightmare. To me that’s backward and unethical.
So I consider Live Preview to be an essential part of the puzzle. We can’t pass the problem on to the content editor, we have to solve it.
Luckily Craft 3.2 added Preview Targets: add whatever options you’d like to the Live Preview pane and they’ll appear in a dropdown menu. Craft loads your specified URL into that iframe, offers a token that can be redeemed for the content that’s needed, and waits hopefully. That URL you provided needs to get the token, present it in exchange for content, and then display that content in a way that’s useful (and expected?) to the content editor.
That feature, combined with the miraculous Mike Pierce gatsby-config.js, means Gatsby can preview content if it’s running in development mode.
The challenge becomes having Gatsby always running in development mode without falling over, while also keeping up to date with changes to its source code. In other words, I need to run gatsby develop on a web server, keep it going and restart it when the project repository changes. But I can’t trust that process to keep running (because software) and I certainly don’t want to SSH in to start and stop it all the time.
Supervisor
I first tried to do this using supervisor, a Linux system process that exists for the sole purpose of keeping processes running. It’s easy to work with in what Laravel Forge labels Daemons. Despite the rule to run only one process, it sort of worked but would eventually spawn multiple children that ate each other and ruined the show.
I don’t know why, because I discovered pm2 and haven’t looked back.
pm2
pm2 is apparently what you would use to keep your node app running on a web server. Unlike supervisor, it’s specific to node apps. It’s also wildly configurable, and it’s been unfailingly stable since I started using it. The preview domain will go down for a minute or two when gatsby develop gets restarted, but there’s no avoiding that since the initial build needs time.

pm2 makes it easy to start, stop, monitor, and manage node processes.
So I have a dedicated preview domain, behind which pm2 keeps gatsby develop alive, and my entire Forge deploy script is...
git pull origin master
npm install
pm2 restart gatsby
Forge deploy script for the Gatsby preview.
I use nginx to reverse proxy preview.workingconcept.com to Gatsby’s dev server port, and it works pretty well.
The input lag and refresh aren’t ideal, but I expect this will improve over time with Gatsby’s evolution and hopefully a Gatsby Craft source plugin. 🤞

The only major downside in this department is that I haven’t found a way to preview the first draft of an Entry. This is unfortunately the most important time to preview an Entry—before it’s been published—and Gatsby doesn’t know about the route or have a way to query the draft.
Hosting
I have a strange love for comparing web hosts, so the simple task of hosting a static frontend gave me plenty of interesting things to overthink.
I think I made two people uncomfortable sharing a FreshPing page I made to see how the exact same site behaved on Netlify, Zeit, Surge and Cloudflare Workers Sites. (Actually I’m sure it was the fact that I deployed the same project to Netlify, Zeit, Surge and Cloudflare Workers Sites.)
Cloudflare Workers Sites was the only one that wasn’t free, Surge was the only one that saw many outages during that recent S3 DNS issue, and both of those require first building the site locally before pushing it to their CDN.
So it was down to Netlify and Zeit.
Each offers a generous free tier, is fun to work with, and is improving all the time. Zeit has the better average response time with less variation, even though that’s un-scientific, and I’ve always had a really smooth experience doing anything I’ve tried with Netlify.
I ended up going with Netlify when I found that Zeit’s redirects are limited to the same project, and I have a single and very unimportant redirect to another unimportant domain. (Sorry Zeit. If it helps, I love Hyper and nobody cares which one I picked.)
Netlify’s redirects can also do a lot, including reverse-proxy paths. Once I settled on Netlify, gatsby-plugin-netlify and gatsby-plugin-remove-trailing-slashes were helpful for maintaining URLs without much effort.
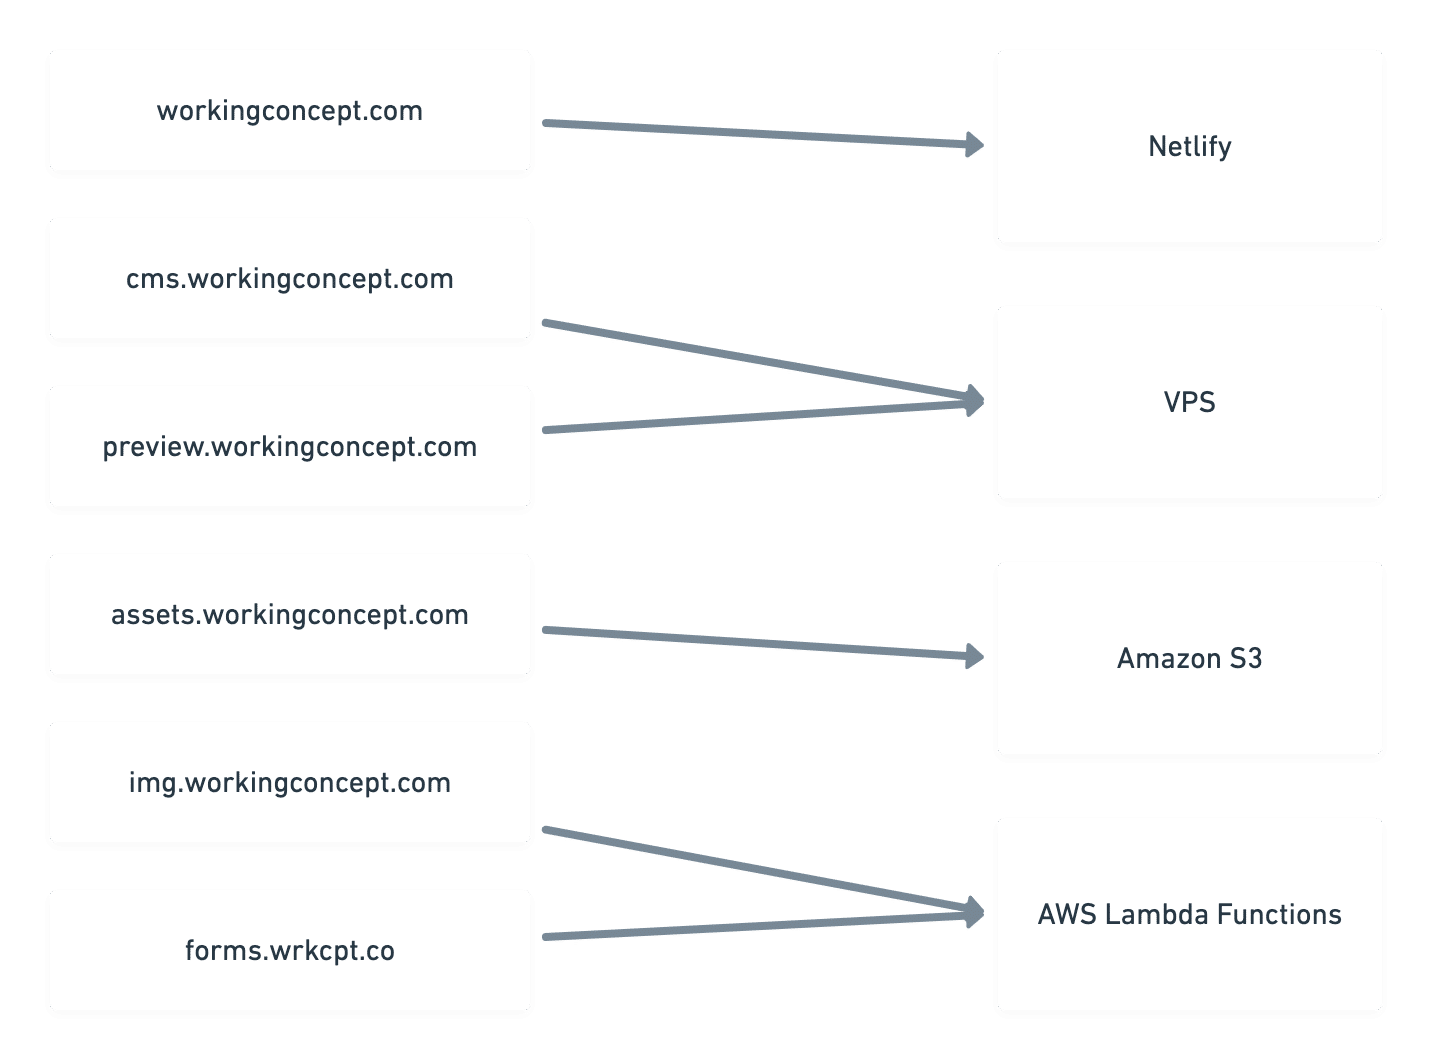
I still need my LEMP stack to run Craft and the Gatsby server for Live Preview. My four-core VPS handles both at the same time with resources to spare, so I’ve now got the following domain layout:
Actual size.
Build Process
Once the frontend is just a static site, it makes it easy to take a YOLO approach to Craft updates, PHP version changes, and other things that could hose your Craft install. Nobody will know because it will have zero impact on the frontend. That part’s liberating.
Netlify can watch the Gatsby project repository and build the site in response to a git push on whatever branch(es) you’d like.
After editing a few Craft Entries and visiting Netlify’s control panel to redeploy, I used the Webhooks plugin to post to a Netlify Build Hook instead. This was good because every content edit would kick off a build, but also bad because every content edit would kick off a build.
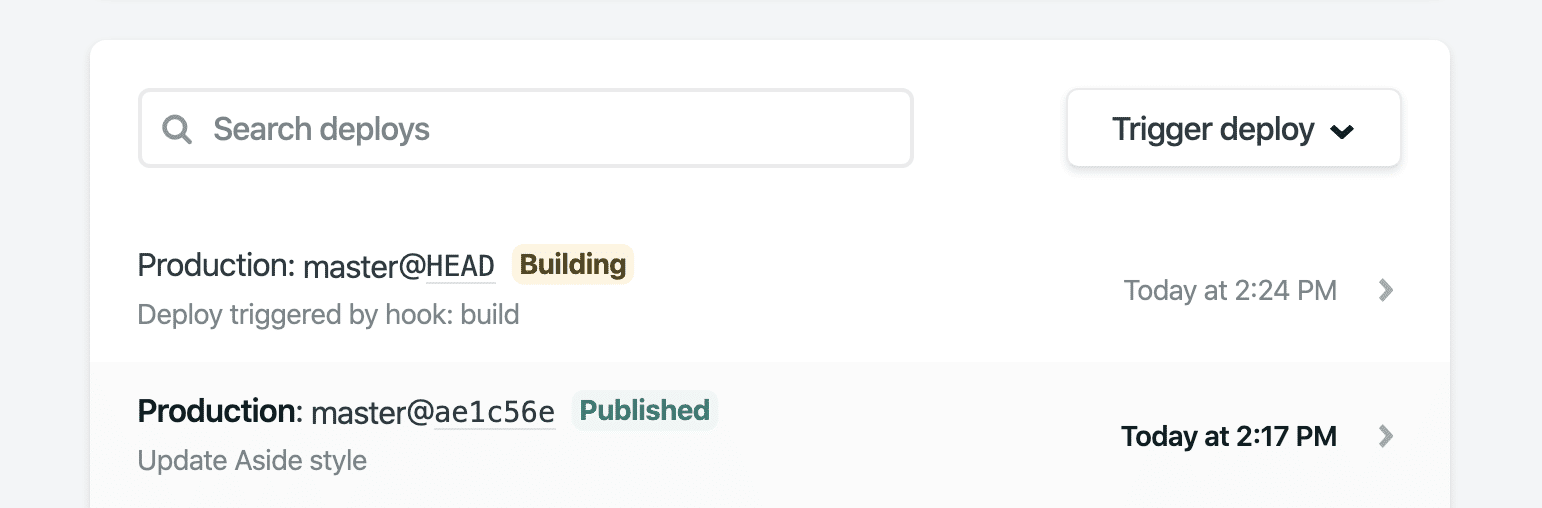
Netlify building this site for the eighty jillionth time.
Rather than deploy on a schedule that’d be building unchanged content most of the time, I wrote a small Craft plugin to debounce these edits. Now every three minutes cron runs the CLI command to check whether a new build should start. If so, it sends a request to the Netlify Build Hook and switches off the plugin’s build flag. Editing Entries (but not Drafts!) will flip that flag back on again, and any edits in a three-minute period will be picked up in the next build.
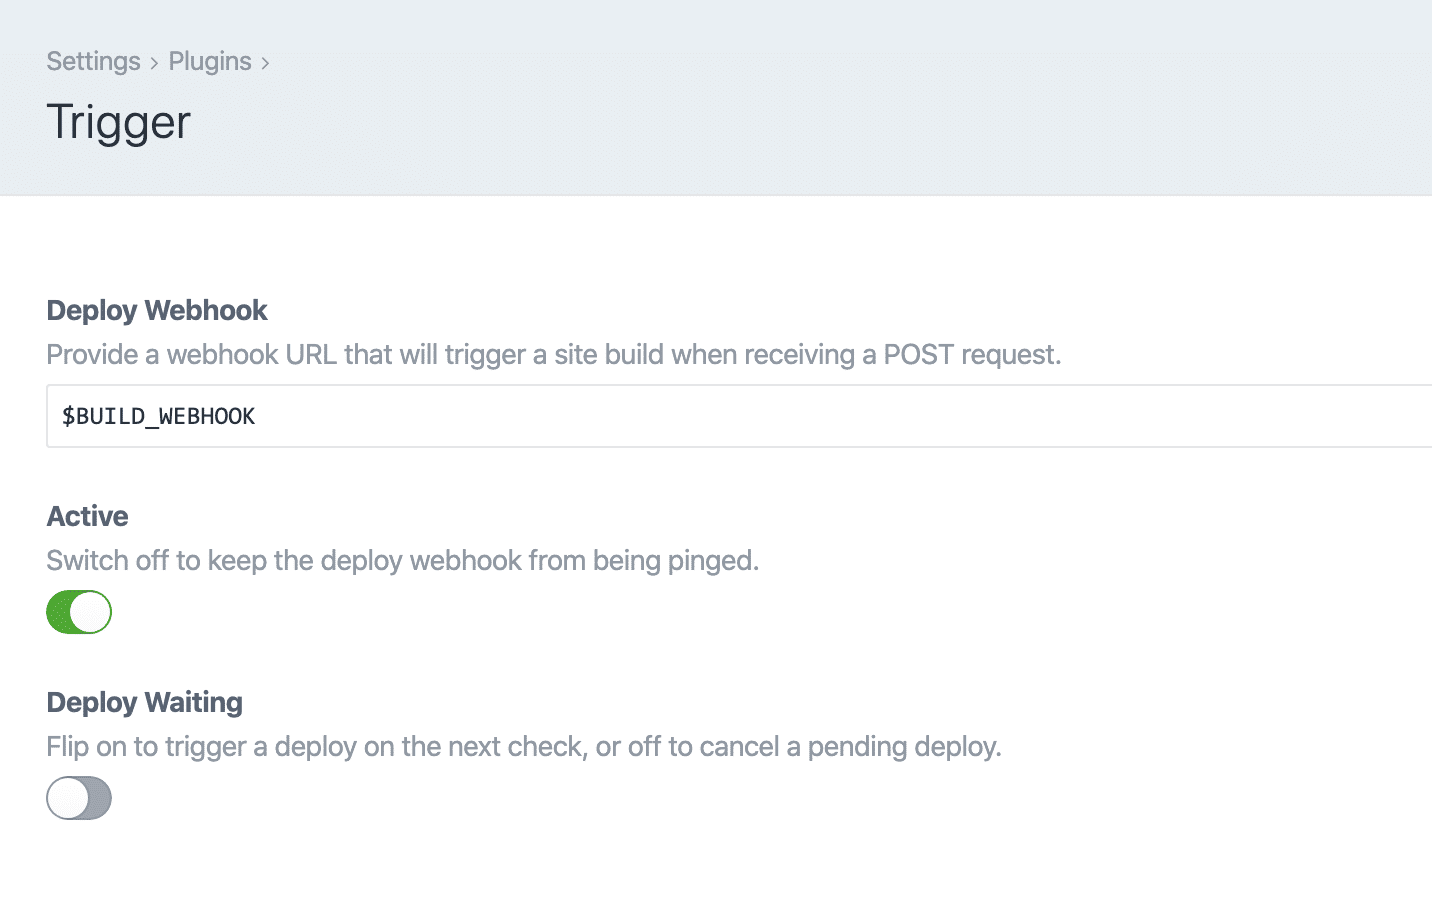
Settings for the deploy-debouncing Trigger plugin.
I may still adjust the check interval to balance instant gratification with fewer builds, but so far it’s been good for triggering just enough but not too many builds. Build time is a precious resource on the free tier—there’s lots of it but I’ve found I can also use it quickly with enough projects and previews.
Unfinished Business
I’m proud that I’m only living with a few compromises right now.
First is that inability to preview unpublished first drafts. Not a deal-breaker for me, but I wouldn’t ask a client to live with that.
Next: with Twig I provided a potentialAction in my structured data that could allow searching blog articles directly from a search engine. I haven’t found a simple way to make that happen with Gatsby, so for now that API isn’t available. There is no way you noticed.
Lastly, Storybook.
Ben Rogerson’s starter project tricked me into using Storybook to organize and document my Twig components. Not only is it a nice way to catalog a site’s pieces, it’s fun to use and even a useful way to develop components in an isolated context.
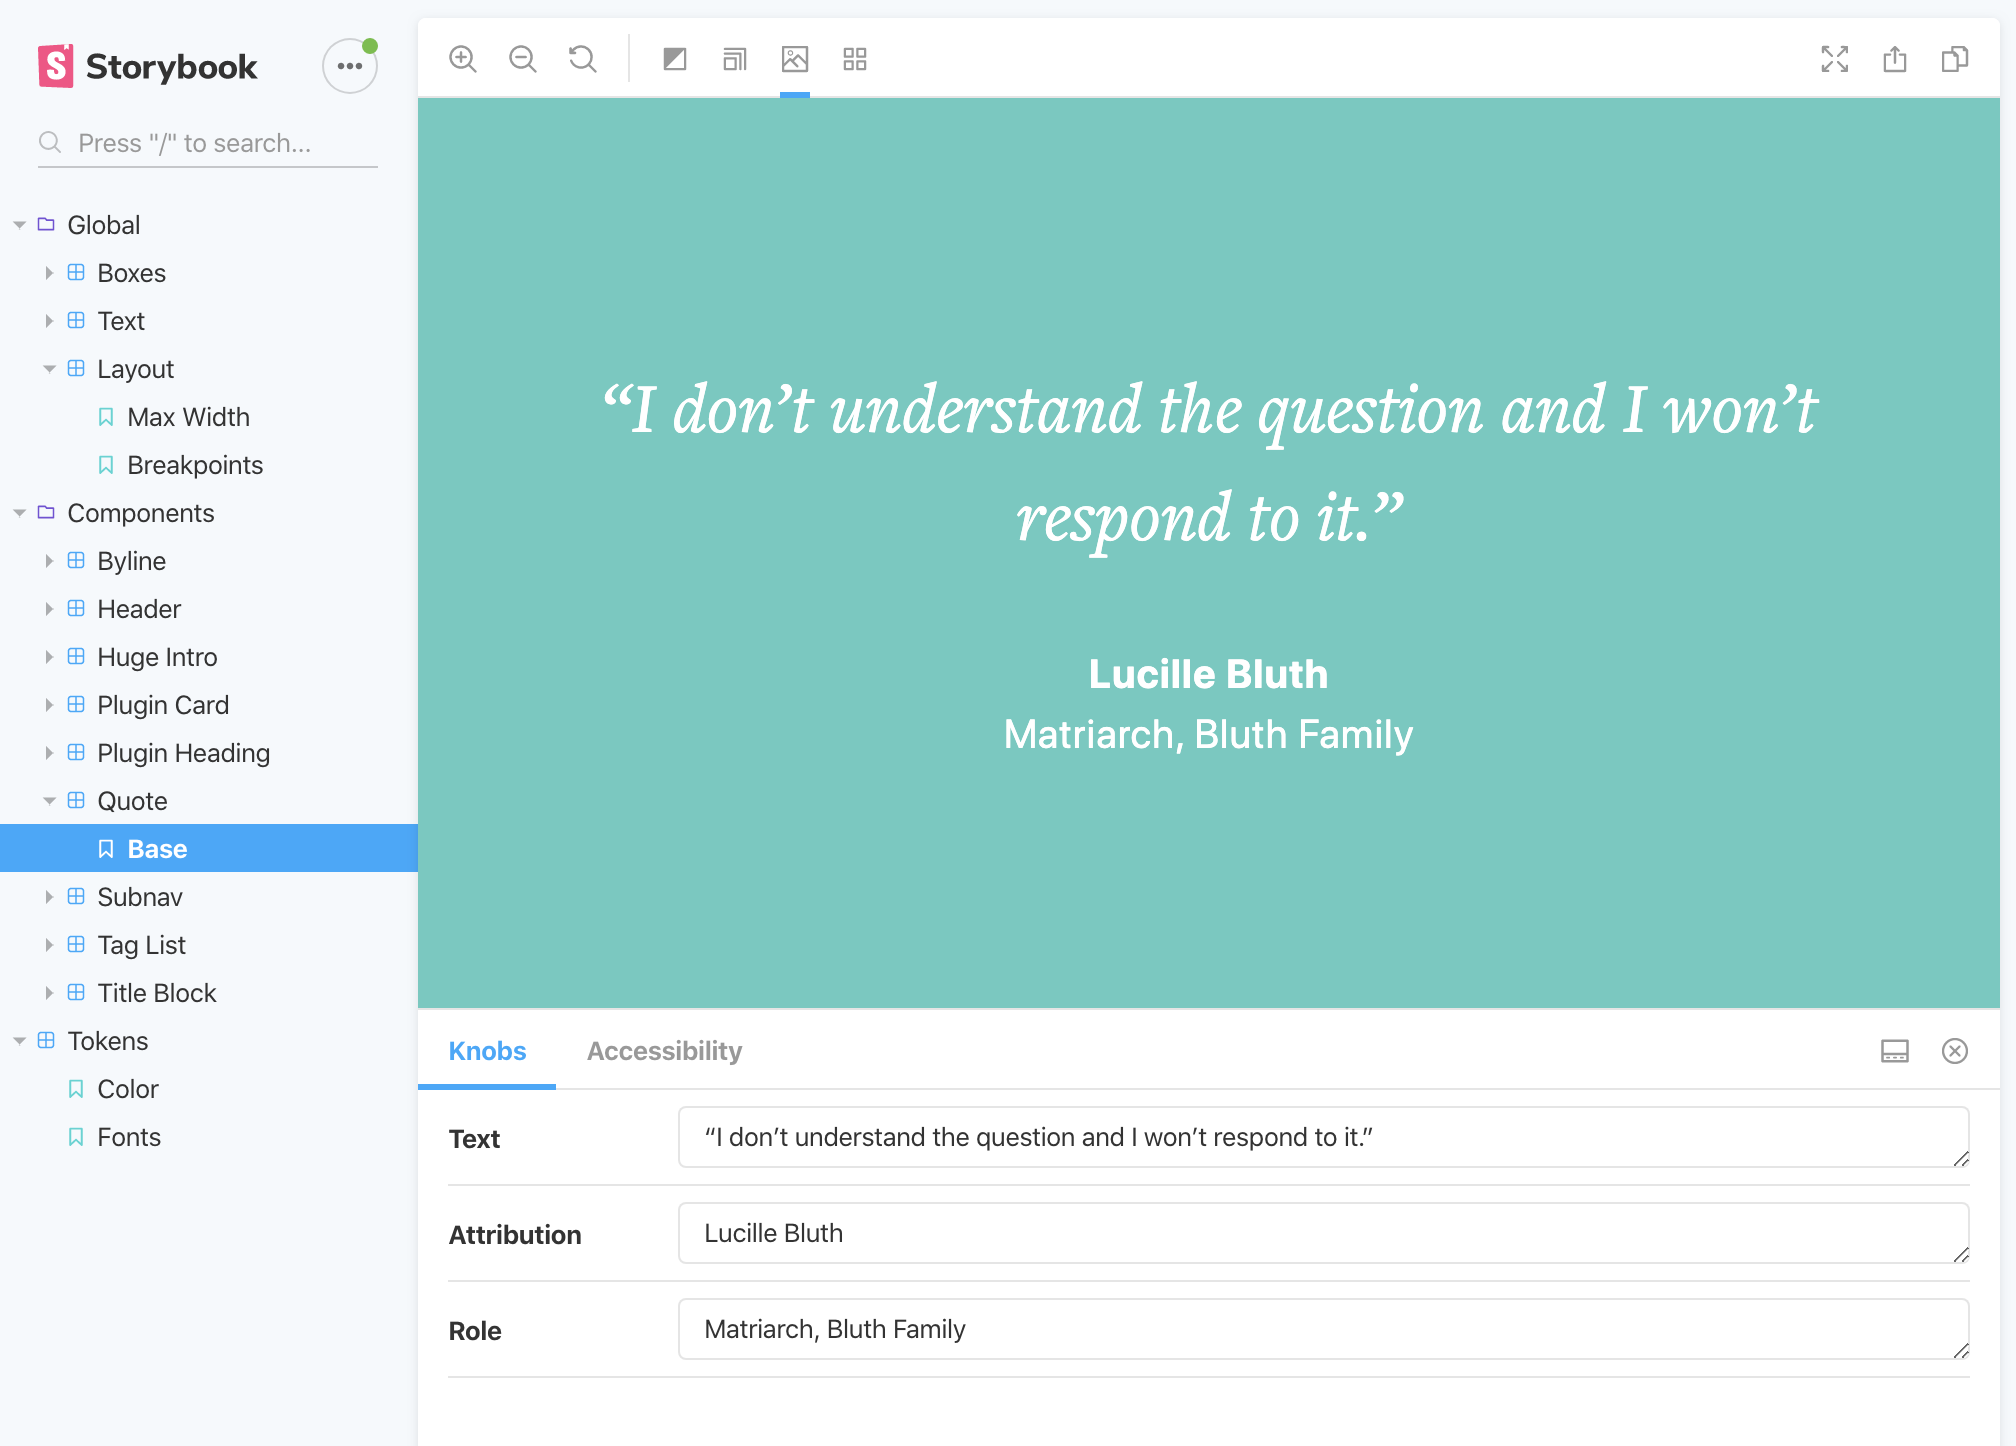
A Matrix pull quote block as seen in Storybook, wherein most components are not yet represented.
I’ve been getting in the habit of using Storybook with client work since it gives everyone a shared point of reference, outside production but built directly from production code. It’s been helpful to be able to link content editors directly to Matrix blocks, for example, whether they’re being developed or simply options in Craft they’d like to see without having to add each with Live Preview. (They get a rich, responsive preview and I don’t have to build documentation with screenshots and descriptions when things get more complex.)
A conflict between Storybook (really fs) and Tailwind has me unable to import Tailwind’s config for visualizing project color, typography, breakpoints, etc. So I can’t offer a working example of that right now.
It builds automatically and exactly like Gatsby onto Netlify, just with npm run build-storybook instead of gatsby build.
What I’ve Learned
I learned a lot from this experiment and won’t be rushing to build every new project with a headless frontend.
Working this way doesn’t eliminate pain points, it just shuffles them around. You’ll have to find new solutions to problems Twig already solves, no matter what kind of projects you work on. I got a personal boost of developer confidence that’s usually in short supply, ultimately navigating some challenges to produce what we can all agree is a website.
The places I struggled the most were...
- Learning to use promises effectively to generate pages in
gatsby-node.js. - Getting more comfortable with modern JavaScript and JSX. (Loved dropping semicolons, auto-formatting, object spread operator, and arrow functions—missed the null coalescing operator.)
- Developing more awareness for SSR (Server Side Rendering), where Gatsby
magicallycarefully takes your dynamic frontend and splits it into SEO-friendly HTML that’s available behind the scenes of the dazzling JavaScript frontend. I still don’t fully grasp everything it does, but I know it forces you to be careful with component state, aware of whether you’re writing JavaScript for the server (node) or the browser, and immediately appreciative of how much easier some things come with Twig.
But building with Gatsby was fun.
Preconfigured webpack, HMR and easy deployment helped me focus more on building things instead of configuring tools. It’s hard to overstate how nice this part was. Instant visual feedback made me feel more connected to my work and iterate faster. Building with components felt inherently more organized and reusable. The improved focus had little frontend ideas bubbling through my head, some of which I implemented. The experience was exciting enough to renew my interest in fixing HMR problems in my Twig workflow.
The frontend freedom is, without question, my favorite part about working with Gatsby or Gridsome and the main reason I’ll keep trying to iron out the wrinkles of the decoupled frontend.
I also won’t try to build just any project this way.
Smaller projects, absolutely! Ones with low page counts and higher frontend complexity, probably.
But I approach most projects with Craft in mind because it’s a blank slate that can handle almost anything out of the box. If not out of the box, then with third-party plugins. If not out of the box or with third-party plugins, with a custom module or plugin I could write. This all assumes Craft is running the way I’m used to thinking of it: as an application on a web server responding directly to requests.
Planning for headlessness means I need to develop mindfulness for the implications of reducing Craft’s responsibility to an API provider. With Craft in this role, a plugin or custom module cannot reach every corner of a public request. That puts more responsibility on the static frontend or microservices and in a place I have less experience. And even with more experience, those things still may or may not be the best tools for the job at hand.
Building projects with headless frontends is not a silver bullet, it’s a different way to split up the responsibilities involved in delivering a website to the visitor. I’ve added some nice tools and experience to my bucket of tricks and expanded my conceptual appreciation for how a project can be built, but I’m not sure yet how exactly how that’ll influence projects to come.
Should You Go For It?
If you’re curious and motivated enough to plow through a series of challenges, there’s plenty to learn having your own run at this. You might even have fun. If everything here seems new and foreign, and you’re pressed for time or resources, it might be daunting to wing it with a new project.
If you’re like me, too many new concepts all at once will cause brain meltdown and require time to re-organize and recover. My best advice would be to create a shopping list of things you’d need to understand, then approach them one at a time like I happened to over the past year.
Set up a GraphQL endpoint and play with it in GraphQL Playground or Insomnia.
Start building some Gatsby or Gridsome templates and publish anything at all to Netlify or Zeit as early as you can.
Do not start with form validation.
Consider Vue if you’re not super comfortable with JavaScript. Component examples will be more consistent and easier to follow.
Figure out who’s neck-deep in this stuff and pay attention to what they’re saying. Paulo Elias has made a number of sobering comments about how things work at a larger scale, Jake Dohm is often helping everyone and he’s insufferably cheery about it. Craft’s own GitHub issues reveal who’s busy with GraphQL and what its limitations may be.
If you’re still on the fence, get in touch with me if you think chatting might help! You don’t want me teaching you React or explaining SSR, but I’m happy to share what my journey’s been like especially if it might be useful for you on yours.