It’s no secret that I’m a fan of Webfaction. For me, the $9.50/month standard service has replaced crappy shared hosts and even some Media Temple DV servers. Webfaction combines the ease of a shared platform—think Media Temple (gs) or your typical $3/month host—with the speed and flexibility of a VPS. The handful of Craft sites I’ve set up on Webfaction fly, with great speed and solid uptime.
If you’re new to Webfaction, there’s a learning curve that can make your first site frustrating to set up. The control panel will undoubtedly be different from what you’re used to, even if it turns out to be really simple. (You may eventually like it, even!) I’ll attempt to help you make sense of things and get your first site up and running in short time.
The key thing to understand is what a Website is in Webfaction’s terms: an Application assigned to one or more Domain Names. This means that to create our Craft site, we’ll set up the pieces and link them together. You can read more about Webfaction’s unique, organized setup in their Applications and Websites guide.
Pros
- Bang for your buck: the fastest, most stable hosting I’ve found for the least amount of money.
- You don’t need to be a sysadmin: you don’t maintain server software, worry about security, or bother with networking issues. Smart, qualified people do that.
- Support tickets are addressed quickly and thoughtfully, no “did you turn it off and on again?” run-around.
- MySQL is particularly fast since it runs in a separate container with its own (free) memory.
- Different geographic locations to choose from: US, Europe, Asia (hint: choose the one closest to your primary audience).
- You can pay to upgrade your resources, so there’s some peace of mind knowing you can scale if/when you need to.
- It’s possible to SSH in and install software on the server, so things are more flexible than you might be used to with a shared platform. More like a VPS in that way.
- The platform is organized and pretty clever, with modern software versions and some thoughtful app install shortcuts. (But no tacky 1-Click garbage!)
Cons
- No phone or live chat support, which could be a shock if you’re coming from Media Temple.
- You’re limited to one set of control panel login credentials, which can make for a funny little shuffle if you’re sharing the account with a client.
- You’ll have to deal with a minor learning curve as you set up your first site.
What You’ll Need
- a Craft site you’ve built, ready to check out from GitHub or Bitbucket
- a MySQL dump of said Craft site
- a spirit of adventure
Getting Down to Business
What we’re going to do is check out our project repository and point a symbolic link to it. The folder structure will end up like this…
~/craft-site
    /.git
    /craft
    /public
~/webapps/craft → ~/craft-site/public
1. Create your Webfaction account, using my referral link if you’re a kind soul, or not if you’re sick of those dirtbags that sprinkle referral links everywhere. Use PayPal or a credit card to plunk down $9.50 and get full access. Choose your username wisely, as it’ll be the basename of your account and used as your site preview URL (i.e. username.webfactional.com).
You can figure this out.
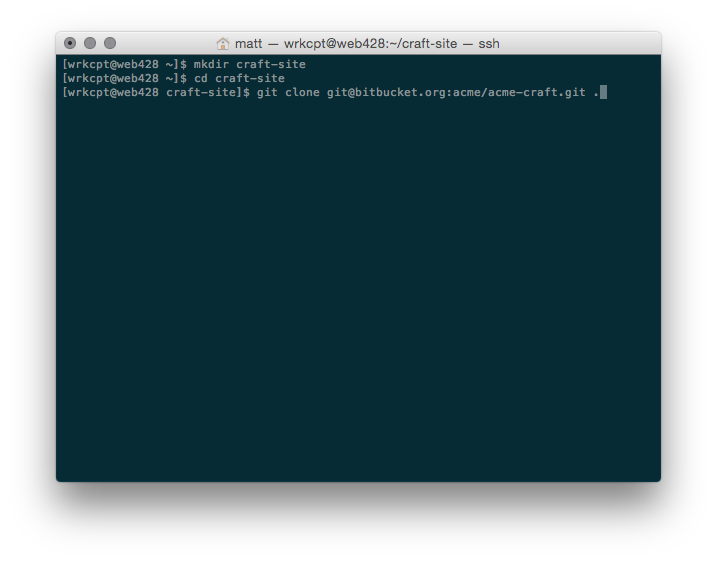
2. Clone a copy of your Craft site by SSHing into your account (ssh username@username.webfactional.com) and creating a project folder. You’ll start at /home/username, so mkdir craft-site to create /home/username/craft-site. Step into this folder with cd craft-site and then git clone your Craft project here. (Something like git clone git@bitbucket.org:acme/acme-craft.git ..)
3. Create a new Application in the Webfaction control panel. You can do this by choosing Domains/Websites → Applications → and Add new application. Pick a sensible name, choose Symbolic link for the App category, and choose the latest PHP option among the Symbolic link to static/cgi/php5x variants. For Extra info, specify the path of the public folder for your Craft project. In this case, it’d be /home/username/craft-site/public.1
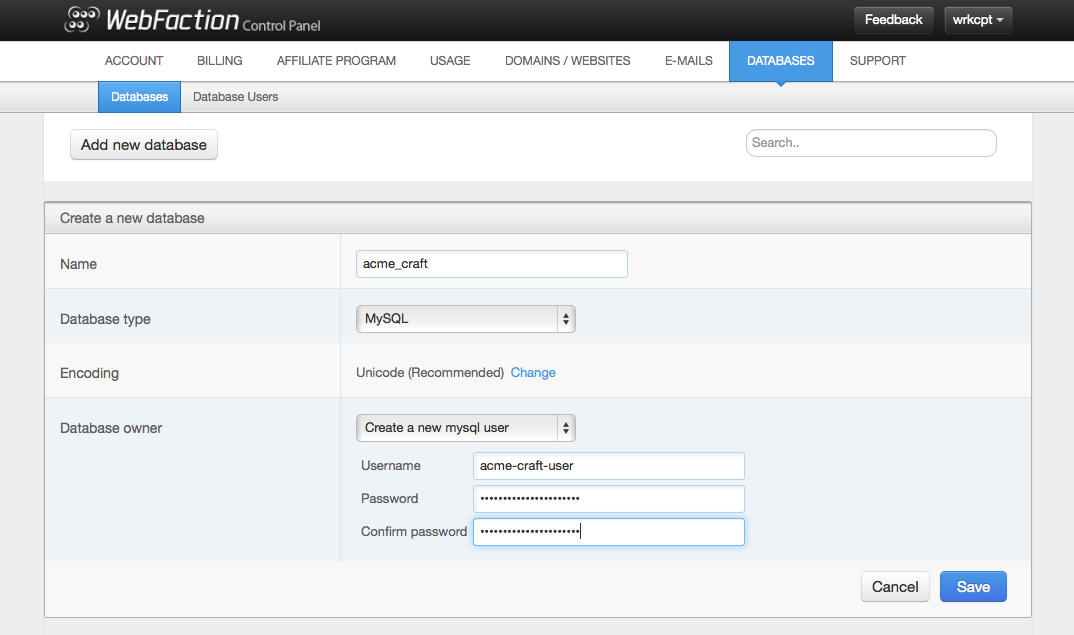
4. Create a new MySQL database under Databases → Databases → Add new database. Pick a name, use MySQL, leave Encoding alone, and create a new user for the database and squirrel away the connection details.
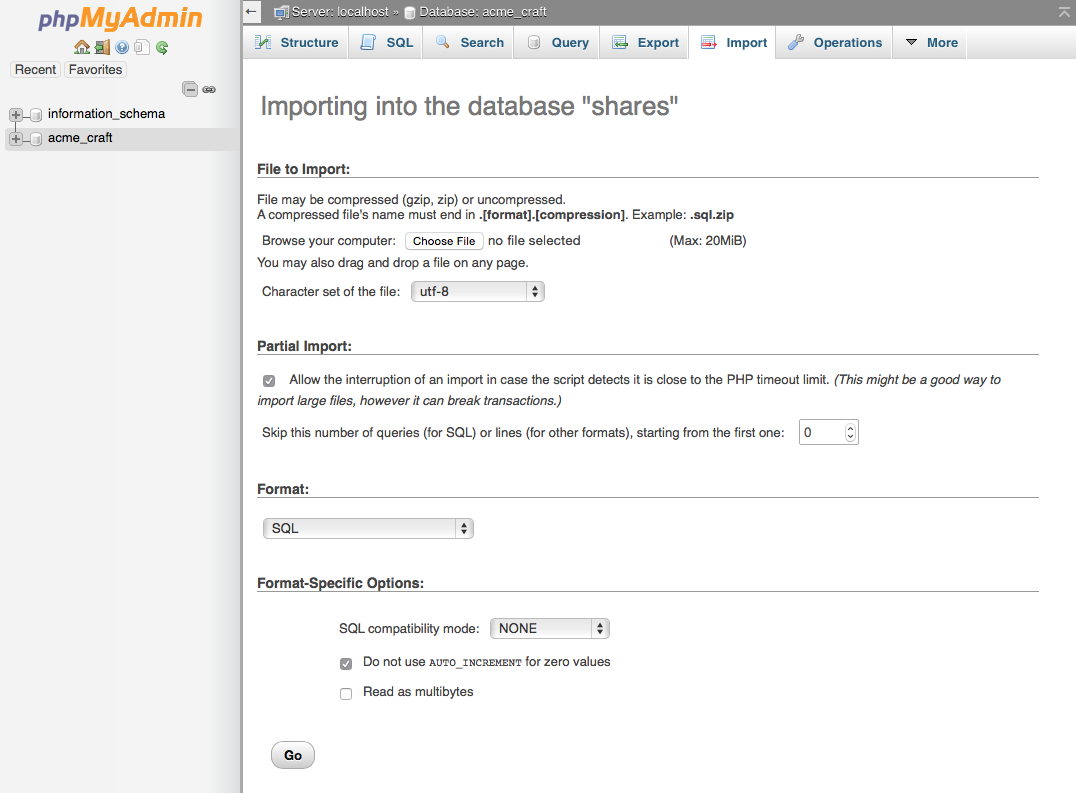
5. Import your MySQL dump by using Webfaction’s phpMyAdmin or connecting a desktop client like Sequel Pro through an SSH tunnel.
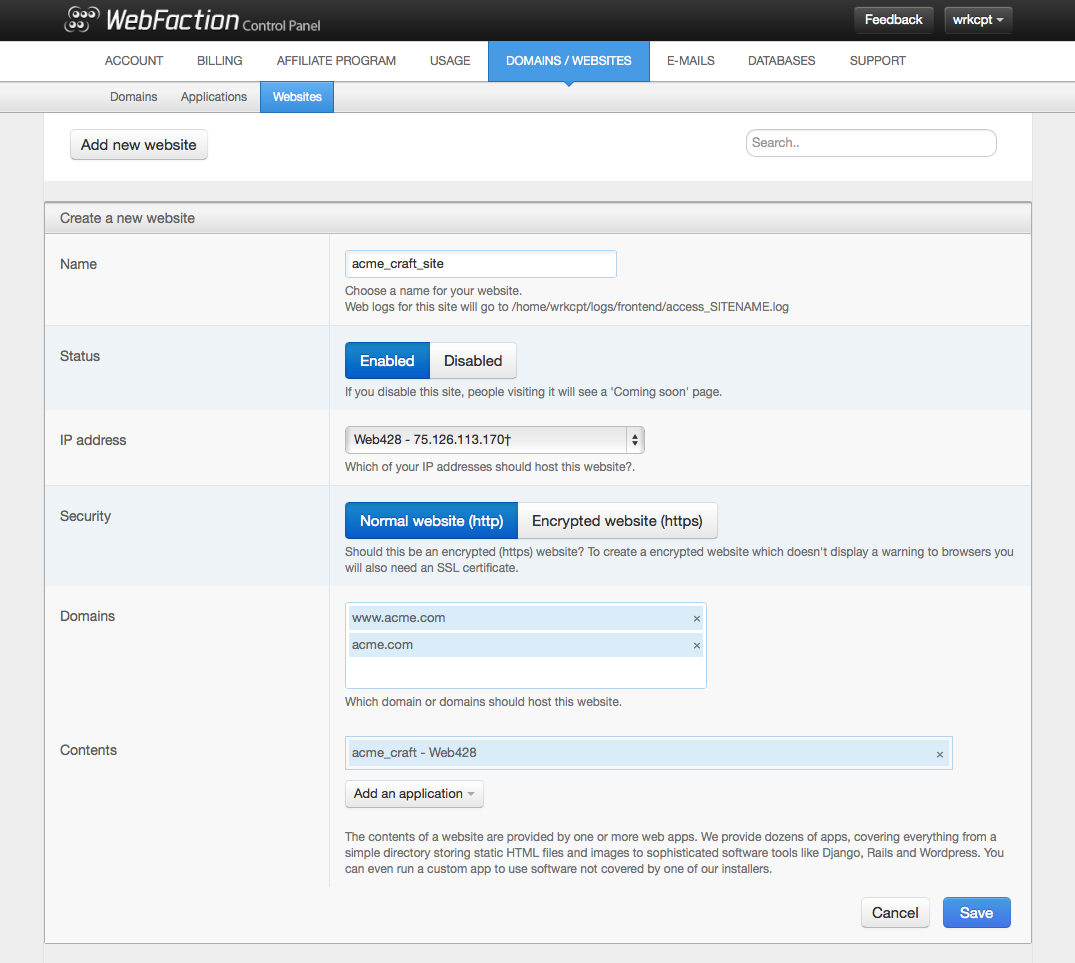
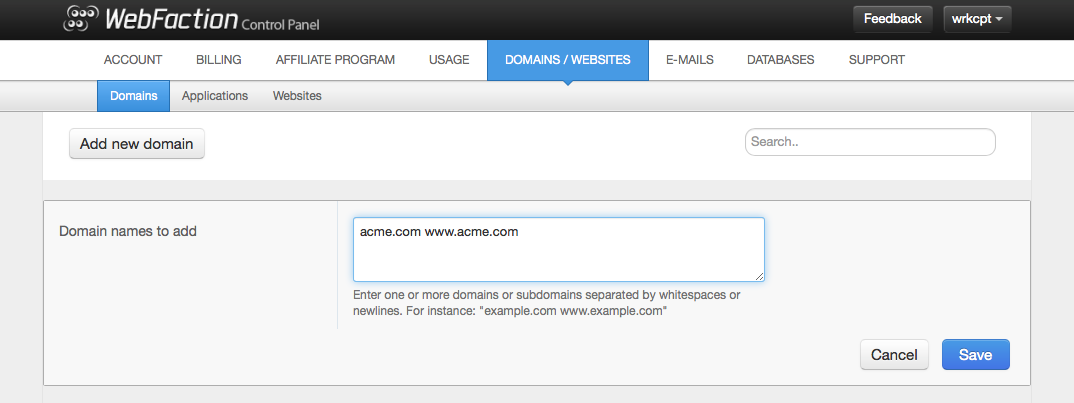
6. Add your domains under Domains/Websites → Domains → Add new domain. These won’t do anything yet, we’re just telling Webfaction we’ll want to use them. If your website is acme.com, here you’ll want to add acme.com www.acme.com.
7. Finally, add a Website from Domains/Websites → Websites → Add new website. Pick another name and skip to domains, where you’ll use the type-ahead field to select the domains you just added in step 5. Choose Add an applicaton → Reuse an existing application, and pick the one you created in step 3. This is a good time to also assign your preview domain (username.webfactional.com), if you want to take a look at your site before pointing your domains to Webfaction. Save and you’re done!
Now that the setup is finished, you’ll want to introduce Craft to your new environment details by editingdb.php and general.php in the craft/config/ directory. I’ll assume you’re already using multi-environment configs and you know how to do this.
Did I miss or fail to illuminate anything in this post? Let me know and I’ll get it updated!
Rather than create a new Application that amounts to a docroot+subfolder, we’re telling Webfaction to point a symbolic link to Craft’s
publicfolder and serve that. Like any CMS that keeps its business end out of the web root, Craft is happy this way and we also get to maintain clean Git pulls without restructuring anything in the hosting environment. ↩