One of my goals this year is to stop spending time maintaining my own private code.
I have a pile of apps and scripts and learn a great deal writing them, but I’d rather focus on sharing and improving code instead of being a hoarder. Another goal is to spend more time on code and techniques I’d offer to clients and fewer rabbit-hole learning quests. So this one’s a two-fer.
After a thorough comparison of VPS providers and ways of provisioning I’ve decided to simplify my live and embrace Laravel Forge. I have a few hosting accounts with smaller providers that don’t offer backup service, so I’ve spiffed up my pre-Forge backup scheme for quick setup on a newly-provisioned Forge server.
It stores data offsite with Backblaze B2 using a command line app called restic.
The combination is stable, inexpensive, efficient and encrypted. A nice perk is that the backups are snapshots, meaning you can choose a specific backup point to browse/restore much like Apple’s Time Machine. This and the built-in encryption make it better than just rsyncing data. (Credit goes to The Full Stack Blog for pointing me toward restic!)
Good news, dear reader: if you’re using Forge, you can probably use this too! Grab it from GitHub (workingconcept/forge-backup), and let’s take a quick look at how it works in the wild.
Requirements
- Server provisioned with Laravel Forge running Ubuntu 18+.
- Backblaze account.
Quick Version
You can clone the repository to start, but everything’s built into one shell script so you can run a one-liner as root:
curl -O https://raw.githubusercontent.com/workingconcept/forge-backup/master/restic-setup.sh && chmod +x restic-setup.sh && ./restic-setup.shNote that you must be root here and not just use sudo.
It’s a good idea to be wary of downloading and running shell scripts as root because some random internet guy said it’s cool on his blog. So let’s examine what happens one step at a time.
Step 0: Ready the Things
Provision a Forge server and keep track of the sudo and database passwords you get. You can safely run this on an existing server as long as it’s Ubuntu 18+, because restic isn’t included in Ubuntu’s default packages for lower versions.
Create a Backblaze B2 bucket under B2 Cloud Storage → Buckets. Pick (and remember) the name and keep it Private.
Now choose Show Account ID and Application Key just above the big Create a Bucket button. Create a key and limit it to your new bucket, and grab the resulting key (large) and keyId (small) you’ll find at the bottom in this screenshot:
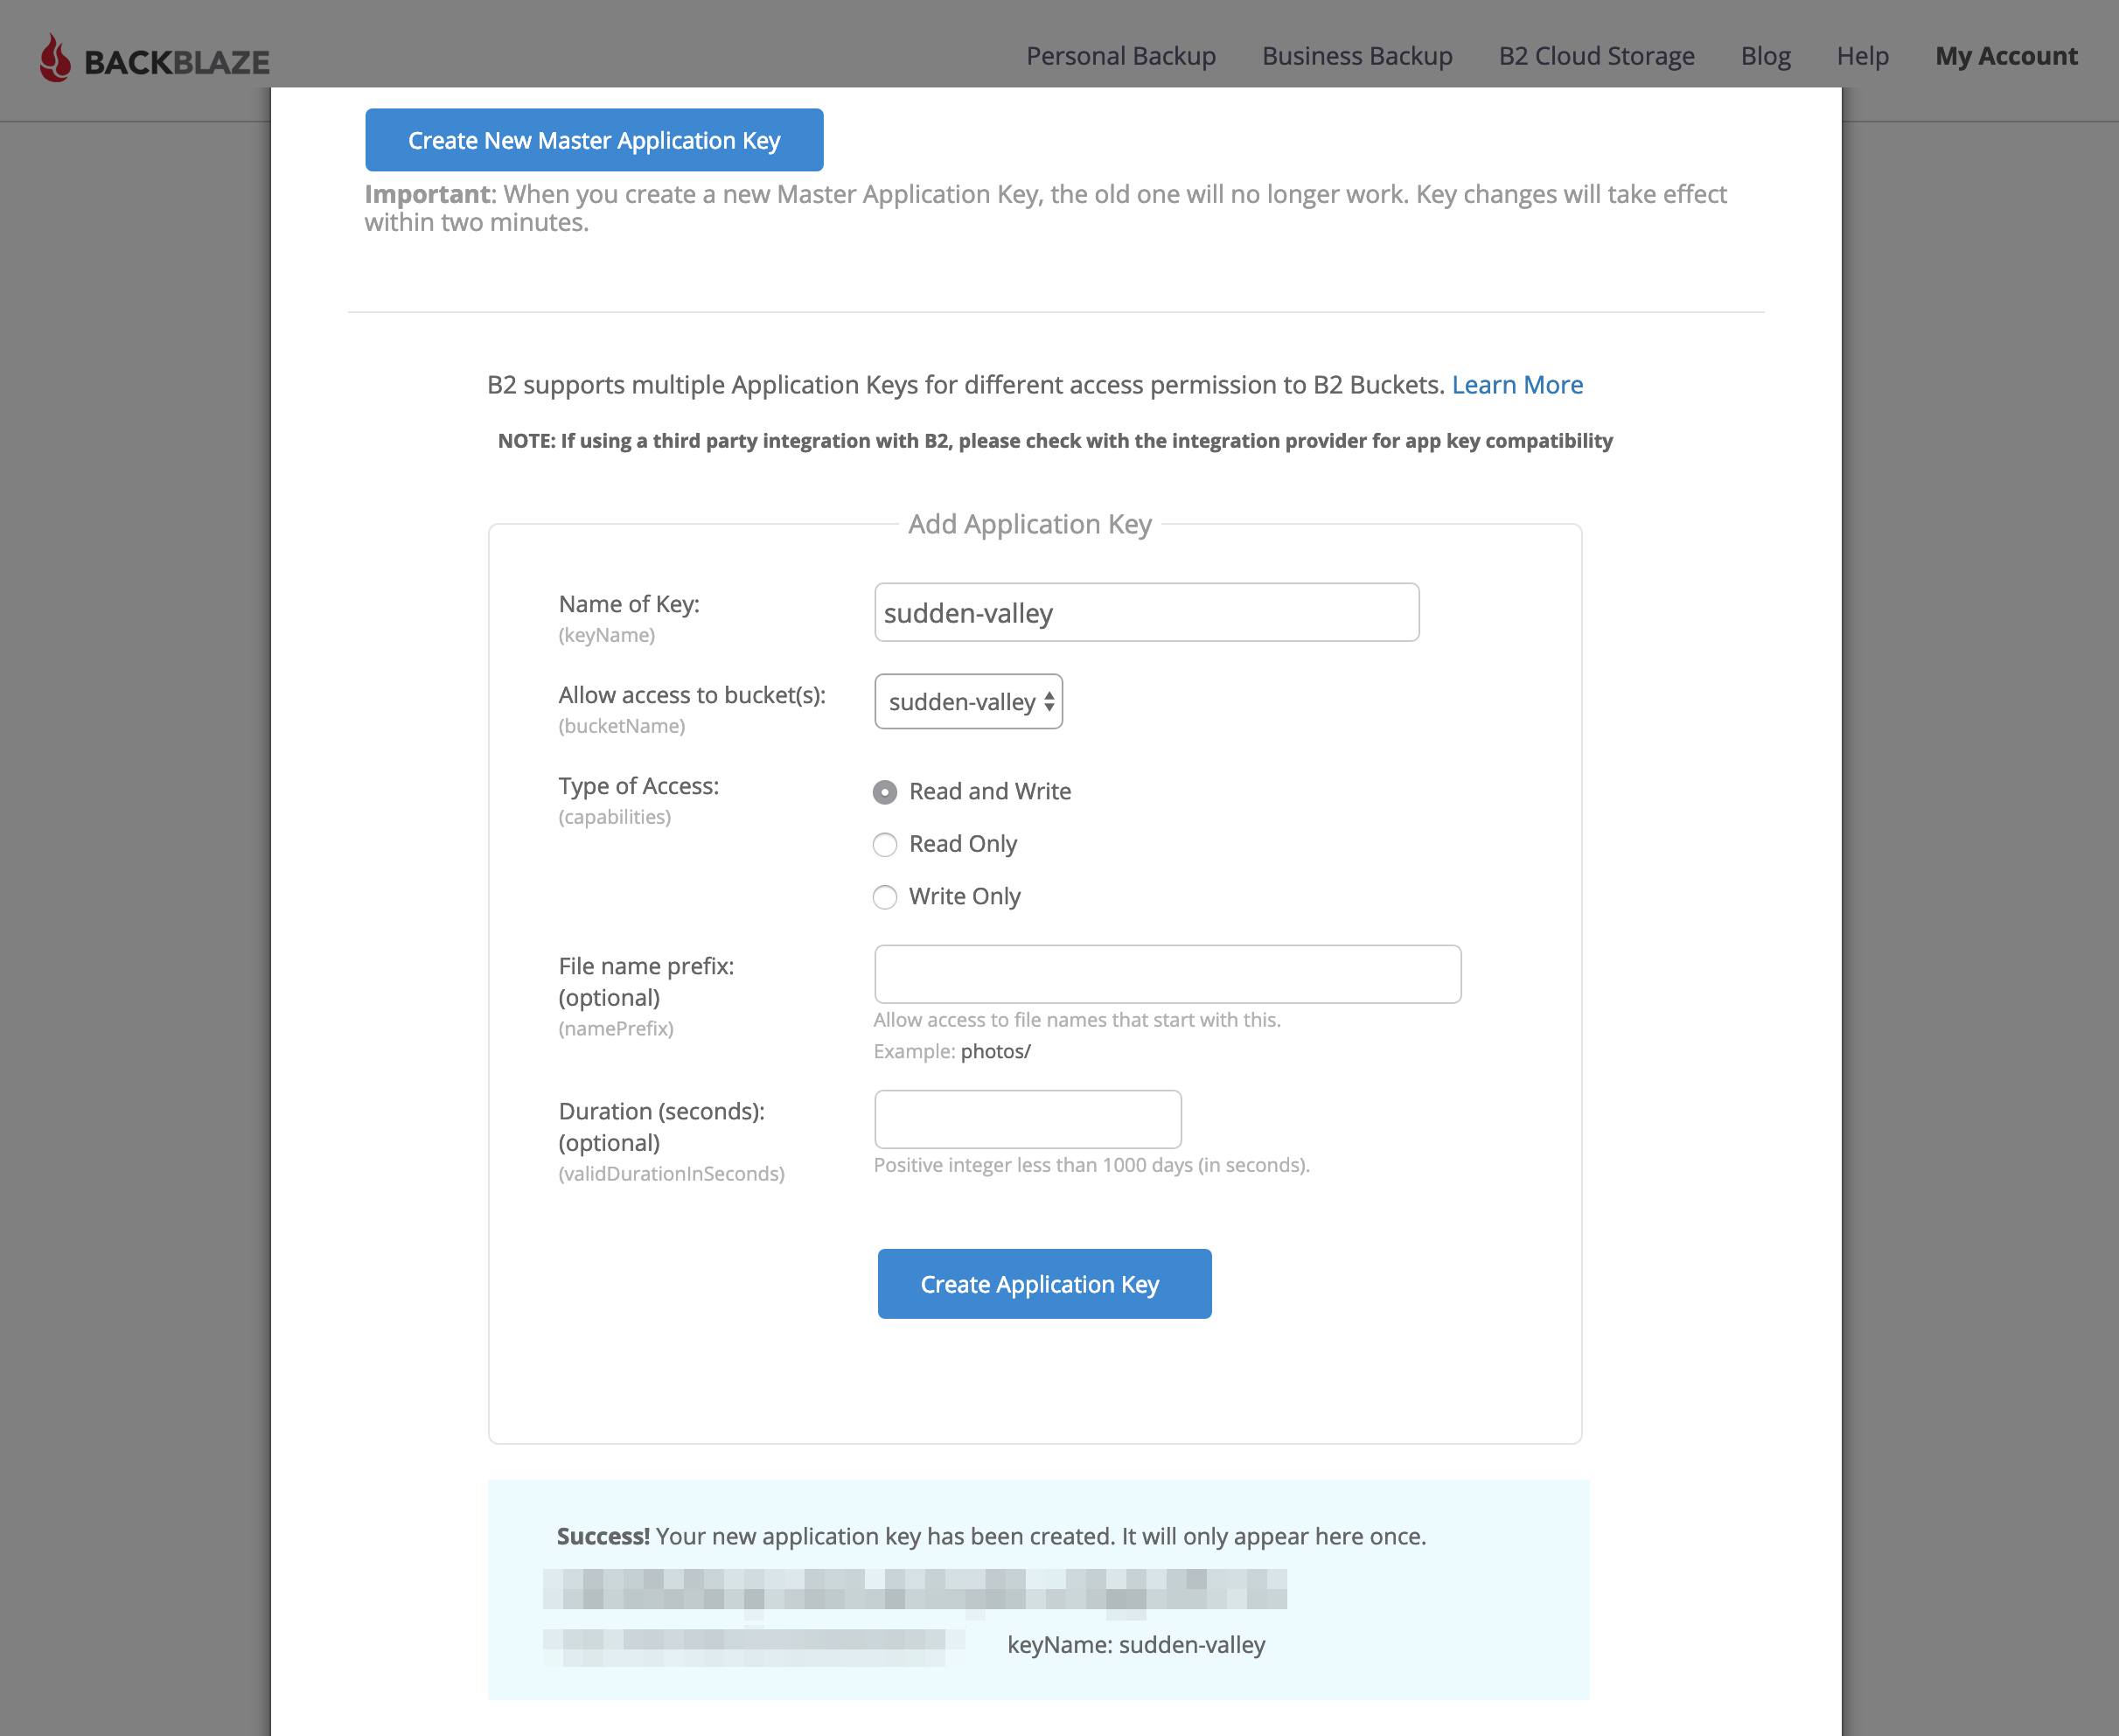
The important part is blurred at the bottom.
We’re ready to continue.
Step 1: Initialize
SSH into your new server and become root.
ssh forge@[SERVER IP]
sudo bash
Copy and paste that one-liner and hit return.
curl -O https://raw.githubusercontent.com/workingconcept/forge-backup/master/restic-setup.sh && chmod +x restic-setup.sh && ./restic-setup.shThis will download restic-setup.sh from GitHub, make it executable, and then run it. That’ll look something like this:
root@sudden-valley:~# curl -O https://raw.githubusercontent.com/workingconcept/forge-backup/master/restic-setup.sh && chmod +x restic-setup.sh && ./restic-setup.sh
  % Total    % Received % Xferd  Average Speed   Time    Time     Time  Current
                                 Dload  Upload   Total   Spent    Left  Speed
100  8379  100  8379    0     0  69825      0 --:--:-- --:--:-- --:--:-- 69825

----------------------------------------
Forge → B2 Backup
----------------------------------------

Enter B2 application key ID:
It’s going to ask for your B2 application key ID, application key and bucket. Then it’ll install restic (apt-get install restic) which will look like this:
----------------------------------------
Installing restic...
----------------------------------------

Reading package lists... Done
Building dependency tree
Reading state information... Done
Suggested packages:
  libjs-jquery libjs-underscore
The following NEW packages will be installed:
  restic
0 upgraded, 1 newly installed, 0 to remove and 5 not upgraded.
Need to get 5,179 kB of archives.
After this operation, 16.4 MB of additional disk space will be used.
Get:1 http://mirrors.linode.com/ubuntu bionic/universe amd64 restic amd64 0.8.3+ds-1 [5,179 kB]
Fetched 5,179 kB in 0s (57.4 MB/s)
Selecting previously unselected package restic.
(Reading database ... 119910 files and directories currently installed.)
Preparing to unpack .../restic_0.8.3+ds-1_amd64.deb ...
Unpacking restic (0.8.3+ds-1) ...
Setting up restic (0.8.3+ds-1) ...
Processing triggers for man-db (2.8.3-2ubuntu0.1) ...
----------------------------------------
Creating /root/restic...
----------------------------------------

----------------------------------------
Confirming MySQL setup...
----------------------------------------

Enter MySQL password for 'forge':
Now you’ll be prompted for your default forge MySQL password, which will used (without being stored) to create a new read-only backup user with access to all databases.
!! created backup user with password: ••••••••••••••••••••

----------------------------------------
Confirming restic repository...
----------------------------------------

created /root/restic/conf/excludes.conf
wrote B2 settings
!! generated restic repository password: ••••••••••••••••••••

Do you want to initialize the restic repo now?
Note the two passwords that were generated and stored, preceded with !! in the setup output.
Answer y to have restic to connect to B2 and establish its backup base. You’ll be prompted for that newly-generated restic repository password, which will be required for interacting with any of that backup data. It’s stored in /root/restic/conf along with the B2 and backup MySQL credentials and an exclude list for the backup set. (If there’s a way to automate backups without storing these secrets please drop me a line or submit a pull request!)
That’s it. If everything worked, you’ve established an encrypted B2 store and set up the pieces you can use to run and automate backups. Let’s try them!
Step 2: Test
Run a MySQL dump with the included shell script.
/root/restic/mysql-backup.shThis will create a compressed dump for each database and store it in /home/forge/backup/mysql/YYYY-MM-DD/DBNAME-{timestamp}.gz.
----------------------------------------
Running MySQL backup routine...
----------------------------------------

backing up 'forge' → /home/forge/backup/mysql/2019-02-26/forge-014202.gz

----------------------------------------
Pruning old backups...
----------------------------------------

Done.
The timestamp will keep your dump archives from overwriting each other unless you can somehow run your backups more than once per second. By default, the backup routine will prune dumps that are more than seven days old.
Now run the backup script, which will ignore .git directories and otherwise back up everything in /home/forge to a new snapshot stored in your B2 bucket.
/root/restic/restic-backup.shResult:
----------------------------------------
Running restic backup → host...
----------------------------------------

----------------------------------------
Running MySQL backup routine...
----------------------------------------

backing up 'dbtwo' → /home/forge/backup/mysql/2019-02-25/dbtwo-110001.gz
backing up 'forge' → /home/forge/backup/mysql/2019-02-25/forge-110001.gz

----------------------------------------
Pruning old backups...
----------------------------------------

Done.
using parent snapshot 5b0f1ba0
scan [/home/forge]
[0:00] 5027 directories, 22746 files, 382.857 MiB
scanned 5027 directories, 22746 files in 0:00
[0:09] 100.00%  382.857 MiB / 382.857 MiB  27773 / 27773 items  0 errors  ETA 0:00

duration: 0:09
snapshot f98c3c33 saved
snapshots for (host [host], paths [/home/forge]):

keep 2 snapshots:
ID        Date                 Host        Tags        Directory
----------------------------------------------------------------------
5b0f1ba0  2019-02-25 11:00:07  host                    /home/forge
f98c3c34  2019-02-26 11:00:12  host                    /home/forge
----------------------------------------------------------------------
2 snapshots

counting files in repo
building new index for repo
[0:42] 100.00%  99 / 99 packs

repository contains 99 packs (28410 blobs) with 410.745 MiB
processed 28410 blobs: 0 duplicate blobs, 0B duplicate
load all snapshots
find data that is still in use for 2 snapshots
[0:01] 100.00%  2 / 2 snapshots

found 28410 of 28410 data blobs still in use, removing 0 blobs
will remove 0 invalid files
will delete 0 packs and rewrite 0 packs, this frees 0B
counting files in repo
[0:11] 100.00%  99 / 99 packs

finding old index files
saved new indexes as [3f3038a6]
remove 2 old index files
done
create exclusive lock for repository
load indexes
check all packs
check snapshots, trees and blobs
no errors were found
As you can see from the output, it’s thoroughly scanning the backup target and making snapshots. It also prunes (removing duplicate data) and double-checks backup metadata against what’s actually stored. It’s nice.
Now try mounting your backup data like you’ve plugged in a thumb drive. (This happens via fuse, if you’re curious, which is included by default with Ubuntu.)
/root/restic/restic-mount.shResult:
----------------------------------------
Mounting backup at /mnt/restic...
----------------------------------------
password is correct
Now serving the repository at /mnt/restic
Don't forget to umount after quitting!
Now you can cd /mnt/restic to browse your snapshots.
root@sudden-valley:/mnt/restic
ls -la
total 4
dr-xr-xr-x 1 root root    0 Feb 26 01:48 .
drwxr-xr-x 3 root root 4096 Feb 26 01:47 ..
dr-xr-xr-x 1 root root    0 Feb 26 01:48 hosts
dr-xr-xr-x 1 root root    0 Feb 26 01:48 ids
dr-xr-xr-x 1 root root    0 Feb 26 01:48 snapshots
dr-xr-xr-x 1 root root    0 Feb 26 01:48 tags
When you’re done unmount that data with umount, which is not a typo.
umount /mnt/resticStep 3: Automate
Add a scheduled task to run /root/restic/restic-backup.sh >/dev/null 2>&1 at whatever interval you want.
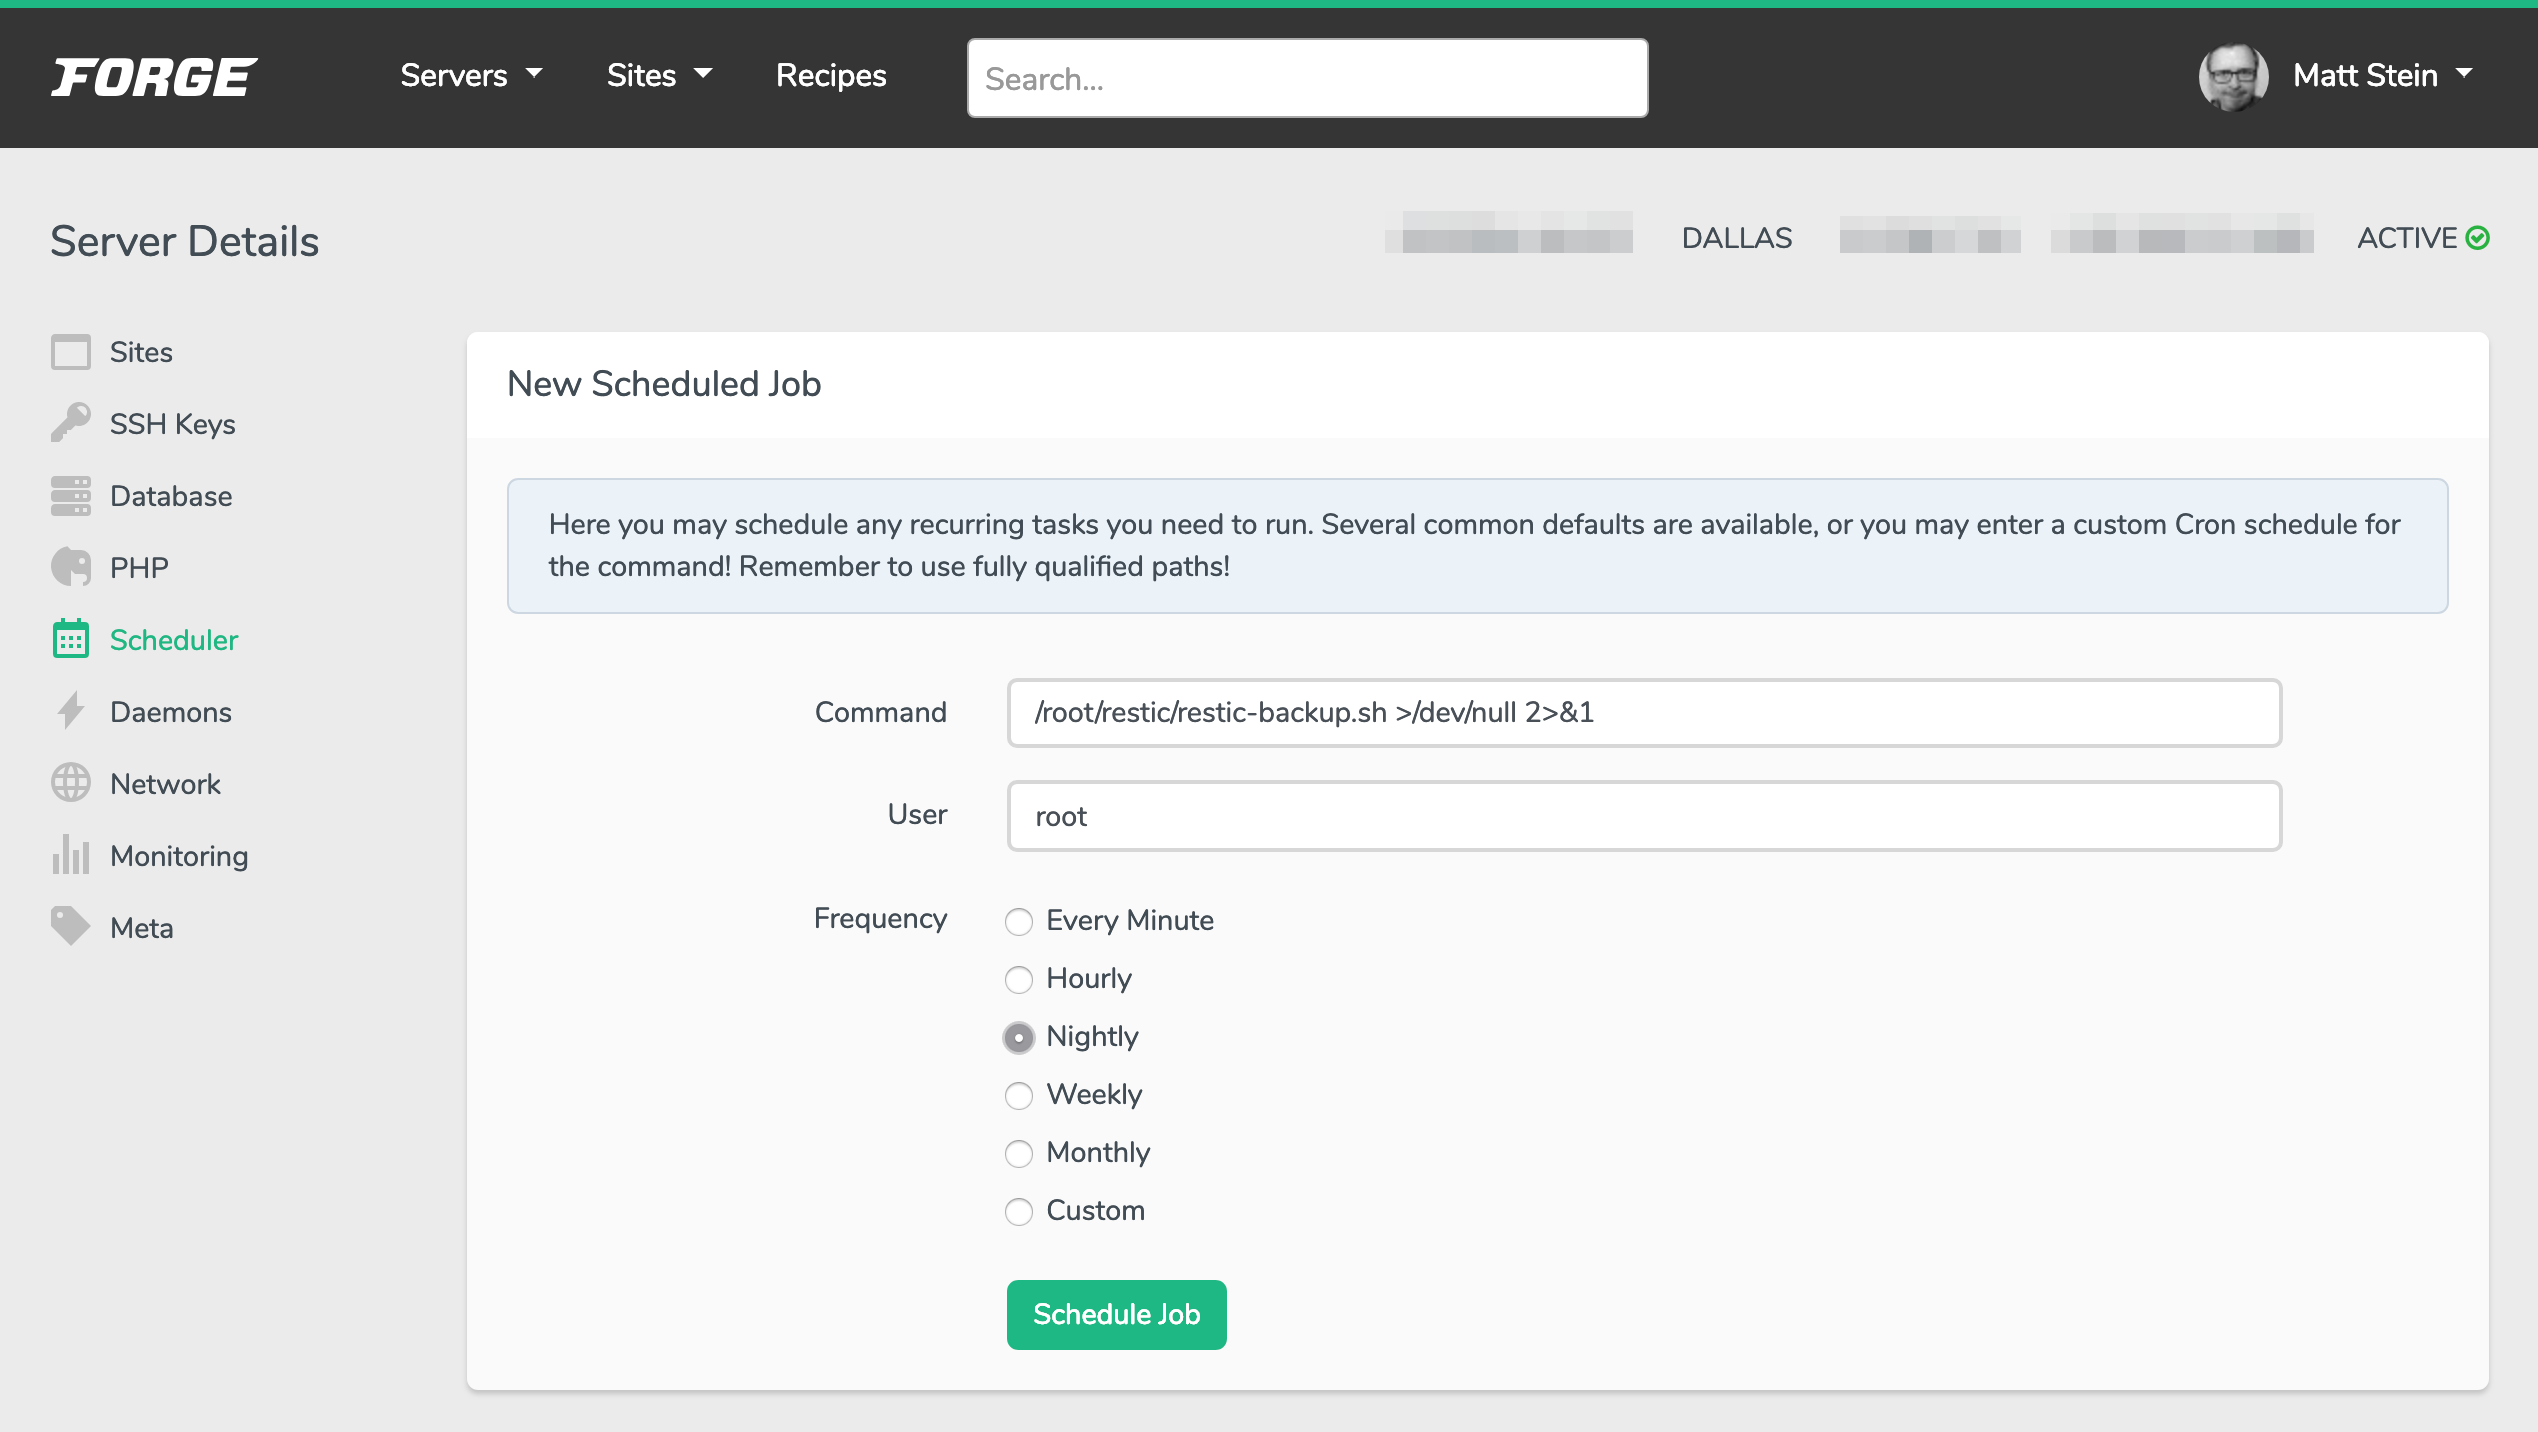
Choose your schedule, just run as root.
I adore that Forge makes it easy to check scheduled log output from its interface, so it’s easy to confirm that the routine is running like you’d expect.
As with all backups, it’s a good idea to mount and verify them every now and then to be sure they’re actually working. I set a monthly calendar reminder to do this.
Consider leaving a comment or sending an email if you have questions or suggestions!